Showing posts with label Memento dye ink. Show all posts

Wednesday, 14 October 2015

The Hop To Stop - part two.


October is National Domestic Violence Awareness month in the USA and the lovely Becca Cruger has organised a blog hop to help. Over the course of their lifetimes a staggering 1 in 3 women will experience domestic violence! Whilst I have been lucky, someone who I'm very close to has suffered in the past and still has recurring nightmares about it, so I'm happy to help raise awareness here.

 The stop to hop can be found HERE.

We were challenged to make cards featuring the colour purple - the chosen colour for the charity. Here is my second card. I thought the peace dove was an appropriate image for this hop. 


All stamps and dies are by Waltzingmouse Stamps. The lovely dove is from the new "Rustic Christmas" stamp set, the trees are from the "Flurries set" and the leafy spring is from "Country Labels Four". I stamped the dove in Memento Grape Jelly ink, masked the image then added the sky with Shaded Lilac Distress ink. I used Memento Northern Pine ink for the sprigs on the background. 

Yay - that's my first Christmas card made for this year! Thanks for looking.

Lynn

The Hop To Stop - part one.


October is National Domestic Violence Awareness month in the USA and the lovely Becca Cruger has organised a blog hop to help. Over the course of their lifetimes a staggering 1 in 3 women will experience domestic violence! Whilst I have been lucky, someone who I'm very close to has suffered in the past and still has recurring nightmares about it, so I'm happy to help raise awareness here.

 The hop to stop can be found HERE.

We were challenged to make cards featuring the colour purple - the chosen colour for the charity. I thought about what it must be like to suffer in this way and decided to use a quote and feathers from Waltzingmouse Stamps "Fine Feathers" stamp set, together with the matching dies.


The other dies used are also by Waltzingmouse. I started with a large stitched rectangle panel and heat embossed two of the small feather images all over using clear embossing powder. Then I blended Shaded Lilac, Milled Lavender, Wilted Violet and Dusty Concord Distress Inks over the panel, before removing the embossing with a hot iron. (One of the only times I tend to use an iron)! The feathers were stamped onto their matching diecuts using Memento Grape Jelly ink, which I also used for the sentiment.


I love all the fine detail in the feathers and I'm pleased with how this turned out! I'll be back later with another card to share. Thanks for looking.

Lynn

Saturday, 18 July 2015

Camellia Birthday Card

Good evening! Here I have a variation on last week's Camellia card - this time for a friend's birthday.


I coloured the Waltzingmouse Camellia flower pink this time and used a different flower head for the background stamping. The sentiment was taken from another Waltzingmouse stamp set, Fancy Phrases, and was stamped onto a narrow stitched fishtail flag (again by Die-namics for My Favourite Things). The finishing touch was a row of three dark pink gems (although they look a bit red on this photo).

Thanks for looking,

Lynn

Friday, 10 July 2015

Waltzingmouse Camellias

Good evening! I have another card to share with you today, this time using the lovely Camellia stamp set from Waltzingmouse stamps.


I started with a six inch square white card blank and stamped one of the smaller flowers repeatedly using Memento Gray Flannel ink. The sentiment was stamped in Memento Tuxedo Black ink onto a stitched jumbo fishtail banner which I cut using a Die-namics die from My Favourite Things - I then added this to the card with foam pads. The large camellia flower head, bud, leaves and stem were all stamped separately in the black ink onto smooth white card, coloured with Inktense pencils then blended with a wet paintbrush. I was lucky enough to receive the Inktense pencils as a gift from a friend - thank you Penny, they are lovely and vibrant!

I fussy cut everything out and shaped the leaves and petals. It's difficult to see in the photo, but I coated the leaves with Glossy Accents, before leaving them to dry overnight. The camellia spray was assembled using clear foam pads and for the final touch I added three small red gems.

This card is now winging it's way to a dear friend in Somerset - I hope she will like it!

Thanks for looking,

Lynn

Sunday, 22 March 2015

Cure for the Monday blues # 46 - Rise & Shine!

Hello there! I have been having trouble with our internet connection this week and haven't been able to post on my blog for what seems like ages! I've made a card for the Cure for the Monday Blues challenge # 46 - Rise & Shine! You can find all the details on Taheerah's blog here . The inspiration photo this week has a monochrome palette with a pop of yellow here and there.


I decided to focus on the yellow pillow with clouds and the sweet little bird - and here's what I came up with.


I started with a white card blank and added a layer of Papertrey's Soft Stone card followed by a layer of Lemon Tart card. Then I diecut several white clouds using my Memory Box Marshmallow Clouds dies, stuck them to the yellow card and trimmed the edges. The cute bird and sentiment are both from Waltzingmouse Stamps Sewing Box Hugs stamp set. I used Memento Tuxedo Black dye ink to stamp the bird three times onto Soft Stone and Lemon Tart bitty dots papers, cut them out and layered them up with clear foam tape. That's it - so CAS for me, LOL!

Thanks for reading and for your kind comments,

Lynn

Friday, 6 March 2015

Spring Coffee Lovers Bloghop

Today I am joining in with the Spring Coffee Lovers Bloghop which has been organised by Amy Tsuruta for the coffee loving cardmakers group. You can find all the details and other entries here. We were asked to make a card with the theme of Coffee, Tea or Cocoa and a Spring feel to it. I chose to go with tea, since I have more stamps and dies that are tea related than coffee ones. Here is my entry.


I used a 5" x 7" white landscape card blank and added some pretty patterned paper from Graphic 45's Botanical Tea collection. Where the papers joined I covered the seam with some Spring Rain Papertrey card which I had diecut with a Cottage Cutz "Tea Time Border" die. I used some of Ken Oliver's Stick It adhesive before I cut the border and I can highly recommend it as it saves so much fiddling about with glue and is really secure. 

The fancy teapot, cups and saucers and teaspoons were all cut and stamped with My Favourite Things Die-namics "Always Time For Tea" stamp and die set and more of the Graphic 45 Botanical Tea papers. They were added to the card with some clear foam tape for added dimension. Finally the sentiment, also from the same MFT stamp set, was added (appropriately) in Espresso Truffle Memento dye ink.

I decided to make a second card, which was almost identical to the first, apart from the design and position of the tea set. I wanted to ensure that the text on the background paper was visible on each card since it is a quote about tea and friendship and ties in nicely with my chosen sentiment.


There are already over 400 entries in this blog hop - that's an awful lot of beautiful inspiration! Thank you for taking the time to read this far! 

Lynn

Sunday, 1 March 2015

Cure For The Monday Blues # 44

I decided to play along with Taheerah's Cure for the Monday Blues again this week as I liked the inspiration photo and had an idea for my own interpretation of it. You can find all the details on Taheerah's blog here.


The inspiration photo is an eclectic pinboard collection, but my eyes were drawn to the "notes" pinned at the top right. So here is my offering for this week. Sorry about all the dots before your eyes, but I decided to photograph my card against my lovely new polka dot tablecloth!


I started with a 6" square white card blank and some Core'dinations Whitewash card that had a black core. I embossed this with a Spellbinders embossing folder and sanded it back to reveal the black core "holes" for my faux pinboard, then I set about making my "notices". The small notepaper stamp is by Mama Elephant from their "Type It" set - thanks to my good friend Penny for the loan of these lovely stamps! I used Memento Dandelion dye ink and a small scalloped border stamp from a set called "Always Time For Tea" by Die-namics to make my yellow patterned paper. All other stamps used are from Waltzingmouse stamps. I found that the small "bars" type stamp from "Free Spirit Boy" was perfect to make the marks on the top note and the middle sized heart from "Sweethearts" was just right for the one in the centre. A couple of colourful brads were ideal for the pins (and I have loads of neglected brads just waiting to be used up)!

The bottom note was a bit more problematical as I couldn't find a tiny horse stamp anywhere - so I adapted the little reindeer from "Nordic Winter" and just didn't ink up his antlers. The lovely scripty hello sentiment from the "Happy Hello Thanks" set was just the job though. I used a resist technique, stamping it in Versamark ink and clear embossing it, then I used a Tuxedo Black Memento marker pen to draw the speech bubble and colour it in, before ironing off the embossing between two sheets of copy paper. A little pink washi tape was used to mimic that in the top photo. The final touch was a bow tied from thick black thread - I liked the effect of the loops as there were also several in the inspiration photo. I'm really pleased with the finished result!

Thanks for looking,

Lynn 

Wednesday, 26 November 2014

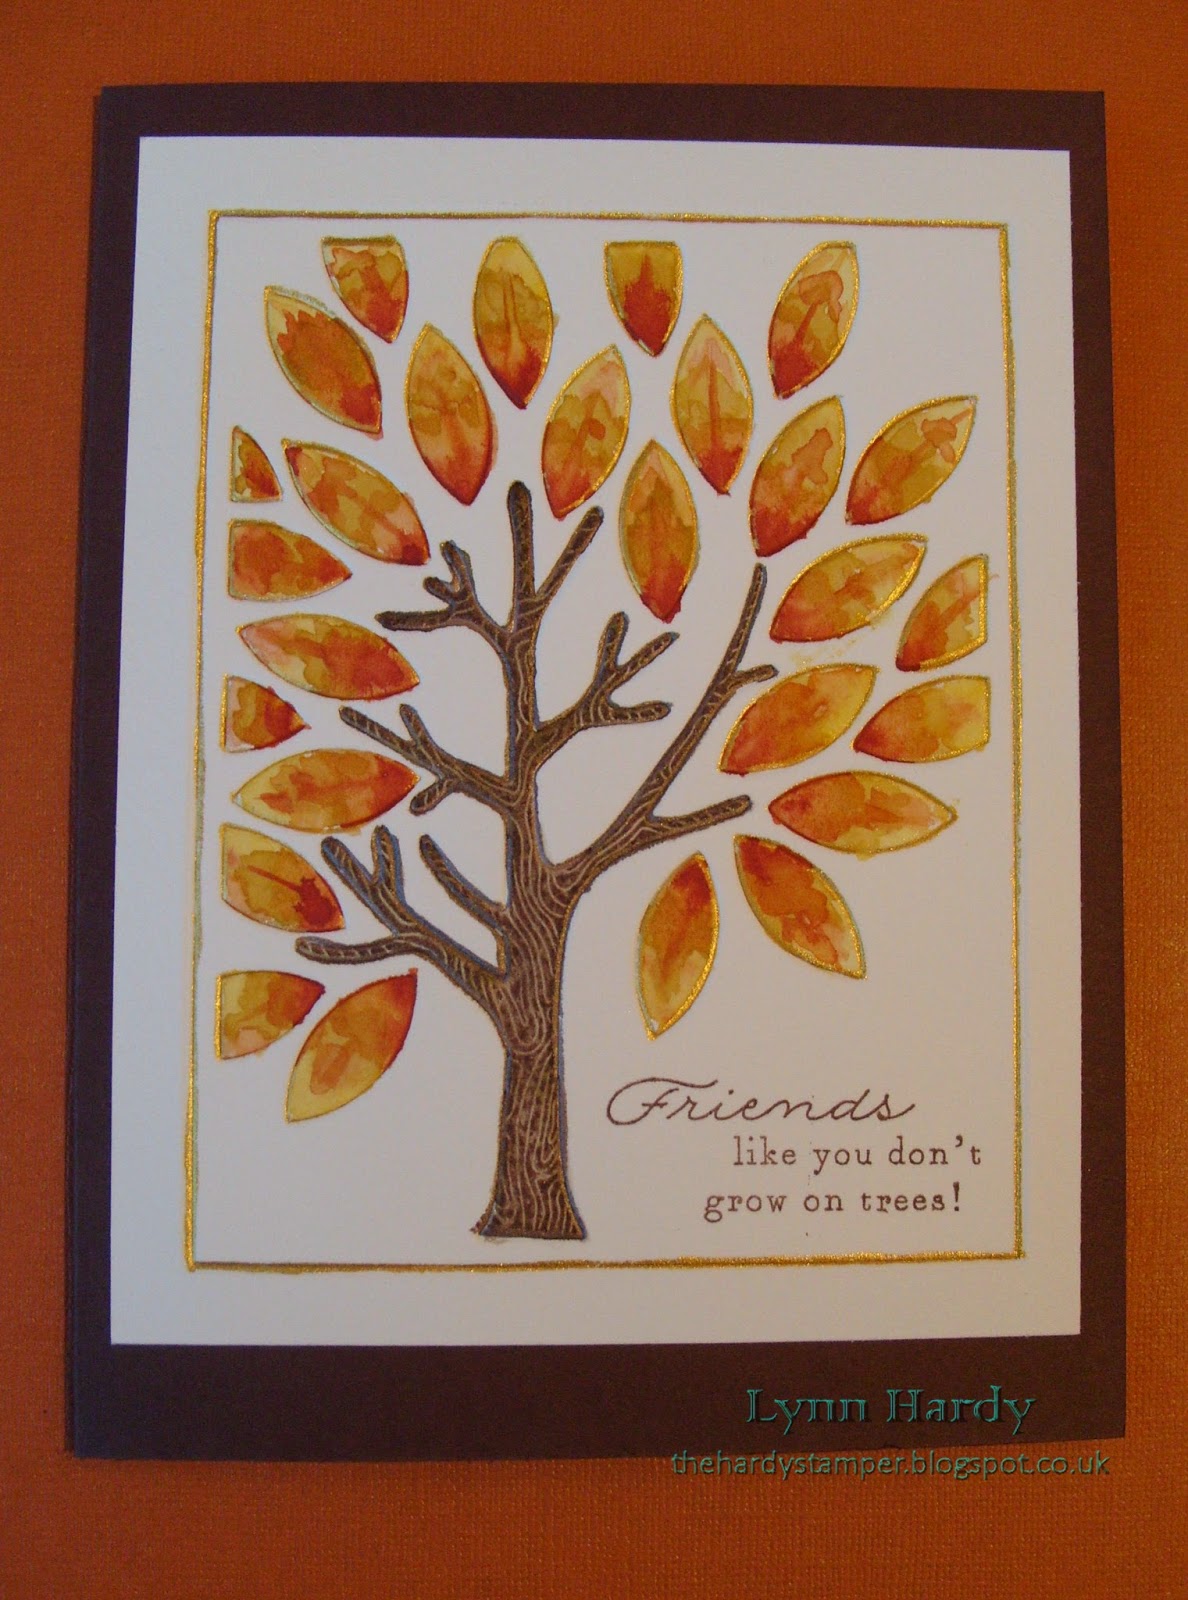
Cure For The Monday Blues Challenge # 35 - Leaves an Impression.

Today I am joining in with Taheerah's Cure for the Monday Blues Challenge #35. You can find all the details on her blog here . This week the inspiration photo shows a dining room with a delightful chandelier bedecked with falling autumn leaves, so I took the leaves as the starting point for my card.


I started by embossing the Papertrey Mighty Oak coverplate onto some Bockingford Watercolour paper. Then I took a very fine paintbrush and painted all the outlines with Rich Cocoa and Solar Gold Twinkling H20 paints. When this had dried I used my regular watercolour paints to colour the tree trunk and autumn leaves, varying the colours of the leaves as I went. The tree trunk was then overstamped with the corresponding stamp from the Mighty Oak stamp set (this is such a lovely set and I'm sure I will be using it lots more in the future too). The sentiment (from the same stamp set) was added with Rich Cocoa Memento dye ink. The entire panel was then simply added to a Dark Chocolate card blank with lots of strong double sided tape to prevent warping.

Please click on the photo above for a larger view. 

I am thrilled with how this card turned out! It's certainly unique and an added bonus was that it was flat for posting. It has already been sent off to a dear friend in the USA - I hope that they like it too!

Thanks for looking,

Lynn.

Sunday, 9 November 2014

Cure For The Monday Blues # 33

I am joining in with Taheerah's Cure for the Monday Blues challenge no 33 this week - you can find all the details here. There is a lovely Autumnal inspiration photo with lots of berries this week.


My card features the lovely Stampendous Snowbird stamp which I stamped onto watercolour paper using Tree Branch Archival ink then watercoloured with Memento dye inks. I used Toffee Crunch, Canteloupe, Morocco and Lady Bug. I edged the panel with the Morocco ink and added it to my A5 card base with double sided tape. 


The background was stamped with a small leaf and berry sprig stamp from Waltzingmouse Stamps Paris Nouveau stamp set and the same Memento dye inks. The sentiment is from Waltzingmouse stamps Complements of the Season set and was stamped in Memento Tuxedo Black. 


Below you can see the finished background. It took ages to do as the stamp was inked up each time with  Memento markers, but I am really pleased with the end result as I think it looks really effective. I shall certainly be trying this technique again.


Thanks for looking.

Lynn

Saturday, 8 November 2014

An Aviation Birthday

Today our eldest grandson Max has his third birthday, so I needed to make him a special card. He is fascinated by all sorts of aircraft and is very knowledgeable for such a tender age. I was admonished by him when I showed him a photo of a helicopter in one of his books - "it's not a helicopter Grandma - it's a Sea King"! Similarly he can tell a Spitfire from a Hurricane etc, whereas I just see a 'plane! We think he might end up being a pilot when he grows up.

So clearly an aircraft card was called for and Clearly Besotted's Take Flight stamps and matching dies were just perfect for the job.


I used a 6" square white card blank and layered some Core'dinations card from the Tim Holtz Kraft Core Nostalgic collection. This was topped with some pretty cloud patterned paper from the "Up, Up & Away" NitWit collection by Lili of the Valley. The letters were cut from the Core'dinations card using the Memory Box Classic Alphabet Upper Case dies and adhered to the card with a dab of Ranger's Studio multi-medium matte.

The aircraft, banners and sentiments were stamped onto smooth white card with Memento dye inks (Love Letter, Tuxedo Black, Tangelo, Dandelion and London Fog). I tried to match the aircraft colours to some of the characters from Disney's Planes (Blade Ranger, Dusty and Leadbottom) as Max is very fond of those too. The coordinating Take Flight dies made it really easy to cut everything out and there is even a little separate stamp for the banner strings, which I stamped directly onto the patterned paper. Everything was stuck onto the card with double sided tape and clear foam pads in selected areas, to add dimension and make it look like the planes were banking round.

I was really pleased with how this turned out and I hope that little Max liked it too.


Here is the birthday boy, modelling the cute aviator hat that his Auntie Jess bought him for his birthday.


We bought Max the matching aviator jacket to match and he looked so cute in his new outfit. Here he is with his Daddy trying to salute. I love the photo below - he looks so pleased with himself!


Thanks for looking.

Lynn

Thursday, 30 October 2014

Pink Roses and Sequins

This week I have been busy card making as I need quite a few cards for various occasions over the next few weeks and I wanted to make a start on them before I begin making Christmas cards. I decided to make a batch of similar cards and started by cutting shaped card blanks from pearlised linen textured card using a Spellbinders Card Creator die.

I chose the triple rose three step stamps from Papertrey Ink's "The Sweet Life" stamp set for my focal point. The roses were stamped first with Memento Angel Pink ink, then Papertrey Sweet Blush ink, with the final layer being Memento Rose Bud ink. I used the matching dies to cut out the blooms, which I adhered to my cards using foam pads. The gold leaves were cut from mirror card using the three smallest dies from the Memory Box Tender Leaves set. The "Happy Birthday" sentiment was cut from the same mirror card using a Simon Says Stamp die and these were adhered with a small amount of Ranger's Studio matte multi-medium, as were the pink and gold sequins. 


The "Thanks" sentiment on the card below is also cut from a Simon Says Stamp die - I love the font used!


I ended up with a batch of two birthday cards and six thank you cards, so I'm very happy with the results!


I am hoping to be back later on today with another card. My blog posts are becoming a little like buses - you wait for ages for one then two come along at once - LOL! Thanks for looking.

Lynn

Monday, 15 September 2014

Waltzingmouse September Pajama Party - Challenge 4. Bedtime Story Sketch.

I'm back again with my second post today for the Waltzingmouse September Pajama Party - check out the full details here http://waltzingmouse.blogspot.co.uk/2014/09/welcome-to-september-pajama-party.html .


Challenge 4 is the Bedtime Story Sketch as shown below.


I really liked this sketch and I needed a couple of new home cards, so I decided to make two versions of the same design in different colours. 


I had received a lovely parcel of new stamps and dies from Claire on Saturday and I couldn't wait to play, so I chose to use the Funky Flowers stamps and dies, together with the Gift Card It Stamp set and dies.


I started with two white 5"x 7" card blanks and matted one with Aqua Core'dinations card and the other with pink card. The two large white panels were then stamped with tiny flowers and leaves using Memento Pistachio dye ink. I added some of this ink to an acrylic block, misted it with water and used a small paintbrush to paint the leaves. I used the same technique to paint the flowers, using Teal Zeal and Angel Pink inks. 

The two centre panels were cut using the gift card die and stamped with the smaller leafy vine border. The tiny house (from Country Labels Four) was stamped with Desert Sand and Gray Flannel ink, which I also used for the sentiment. I added a band of ribbons to each card and mounted the centre panels with foam tape to add dimension. 


Finally I added flower and leaf embellishments, cut from felt with added tiny spotted buttons for the blue card and pink card stamped with flowers for the pink one. 


I am really pleased with how these turned out! Thanks for looking!

Waltzingmouse September Pajama Party - Challenge 1. Doodle Do.

Firstly I must apologise for my long absence from blogging. I haven't been able to create anything recently as my husband unfortunately suffered a stoke at the beginning of August and our lives were turned upside down for a while. Things could have been so much worse though, so we are very thankful for the wonderful treatment he received and that he is continuing to get a little better each week. Given the circumstances, I thought that it would be appropriate to make a thanksgiving card!


I am joining in with the Waltzingmouse September Pajama Party today - you can check out all the details here http://waltzingmouse.blogspot.co.uk/2014/09/welcome-to-september-pajama-party.html . Challenge 1 was to create a card and add some doodling. My offering is not so much Cock-a-Doodle-Do but more Turkey-a-Doodle-Do!


I decided that I'd like to create my own Thanksgiving turkey by using the Funky Feather stamps. I also used the small pair of wings from the Fine Feathers stamp set. I chose the lovely oak and maple leaf stamps from the Peace and Plenty stamp set to stamp my background with Memento Espresso Truffle dye ink and the sentiment also came from the same stamp set.

I started with an eight inch square white card blank and added a layer of khaki coloured card which I had stamped with the two leaves. I used the fine tipped end of a Memento Espresso Truffle marker pen to add doodling - trios of small dots, veins on the maple leaves and dots around the frilly edges of the oak leaves. 


I used a grand scalloped Spellbinders die to cut a large scalloped circle from smooth white card. Then I inked up one of the long feather stamps with Desert Sand ink at the top, a stripe of Espresso Truffle ink and Toffee Crunch ink towards the bottom. The feather was stamped repeatedly around two thirds of the circle to form the turkey's tail feathers. I used each scallop as a guide for the first layer and overlapped the feathers towards the centre of the circle (see below).


The photo below shows the detail of the tail feathers, once I'd stamped more feathers in between each of the the first ones.


I used a similar technique (with the addition of Potter's Clay ink) to stamp the next layer of smaller feathers onto a separate piece of white card. This was fussy cut out, doodled with extra markings and added to the card with clear foam tape to add dimension. Then I took another piece of card and stamped the short plump feather to form the turkey's body. I added the wings (from the Fine Feathers set), doodled his legs and feet, cut it all out and added it with clear foam tape. The final layer was the plump feather body again - this time with the addition of a doodled turkey head! Details were added with Memento marker pens and I used more clear foam tape to assemble the turkey. Finally I added a few turkey footprints, some more doodles around the scalloped edging and the stamped sentiment. The photo below shows this in more detail.


My Thanksgiving Turkey was so much fun to make! Thanks for looking!

Sunday, 22 June 2014

Cure For The Monday Blues Challenge # 21 - Placing Pizzazz

I have been feeling in a floral mood today - probably because we have some gorgeous blooms out in our back garden at the moment. I'm not sure exactly what these purple flowers are, but they have very dark centres and pretty frilly leaves and are looking particularly lovely this year.


We built an arbour last year and planted some honeysuckle at the back, which we took as a cutting from my Dad's original plant. We bought a pair of red climbing roses to train up the trellis each side - we chose these as my Dad used to love roses and David's Mum used to love red flowers, so we thought it would be a nice way of remembering them both. This year they are doing really well and have produced some stunning velvety red blooms, so I couldn't resist taking some photos to share.


This week Taheerah has chosen an inspiration photo which also has bright flowers, http://littlemisst-papercraft.blogspot.com/2014/06/cure-for-monday-blues-challenge-21.html , so I decided to focus on those and design a more Clean and Simple card. Those of you who know me will realise that I don't usually do CAS - I am always too tempted to keep adding layers and embellishments - so I think I've been much more restrained for once - Lol!
 

Source: Pinterest
 
 
I decided to concentrate on the three blooms in the inspiration photo above, so I selected the pretty peony stamp from JustRite's "Seeds of Summer" clear stamp set (CR - 03755) and started by stamping it onto some Friskett masking paper and cutting it out carefully to make a mask. Working directly onto a white DL card blank I then stamped a vertical row of three of the peonies using Watering Can Archival Ink and my mask. I used Tim Holtz Distress Markers in bundled sage, festive berries, mustard seed and spun sugar to scribble some ink onto an acrylic block, then I picked this up with a fine detail tipped waterbrush to watercolour the flowers. As I hadn't used watercolour paper the card warped a little, so when it was dry I found my iron and actually ironed it smooth again!
 
 
Please click on the photo for a better view.
 
 
The Thank You sentiment is from Clearly Besotted's "Many Thanks" clear stamp set and was stamped with Tuxedo Black Memento Dye ink. I used foam tape to adhere the sentiment to a banner which I made by stamping the polka dot background from the "Gingham & Co" clear stamp set by Waltzingmouse Stamps with Rose Bud Memento Dye ink and trimming into a banner shape. At this point I had to sit on my hands to stop myself from adding anything else!
 
So I have probably shocked you three times today - with a CAS design, doing some ironing, and (very unusually for me) completing and blogging a card several hours before the actual challenge deadline! I think I'd better go and lie down in a darkened room!

Monday, 16 June 2014

Cure For The Monday Blues Challenge # 20 - Love's Young Dream

Challenge number 20 for the Cure for the Monday Blues (see full details here
http://littlemisst-papercraft.blogspot.com/2014/06/cure-for-monday-blues-challenge-20.html )
was to make a card using this lovely photograph as inspiration.

Source: Pinterest
 
The photograph shows a pretty bedroom that was designed for a young girl, using pinks, pale aqua, touches of gold and splashes of bright, vibrant colours. Further information about the design can be found here http://honeyandfitz.com/2013/12/19/chloes-mermaid-inspired-big-girl-room/ where you can see all the attention to detail and some before and after photos.
 
I decided that I'd like to try to replicate the pretty floral rug on my card. Here is a close up of the actual rug design which can be found here http://www.pbteen.com/products/martina-rug/ .


I started by making an A5 card base from some sturdy pale pink pearlised card, then I used an A4 Spellbinders embossing folder to emboss a strip of darker pink card with a polka dot pattern. I highlighted some of the dots with a Distress marker to mimic the bedspread and adhered the polka dot strip to the left of my card blank. I cut a smaller rectangle of Papertrey Ink pale aqua pearlised card for the floral panel then used Versamark ink and gold embossing powder to heat emboss the sentiment (from Hobby Art's clear Sentiments stamp set - CS026D). I also heat embossed the chandelier from the Elusive Images UDLSP0329 Bella stamp set (now Chocolate Baroque) onto pale pink card and fussy cut it out. I used Memento Teal Zeal dye ink to stamp some of the doodled swirls from Elusive Images stamp sets UDLHC0131 and UDLHC0132 and one of the small flowers from the Fantasy Floral set (UA4SP0185).
 
For the brightly coloured flowers I used a selection of coloured card and dye inkpads, together with a white pigment inkpad. Some of the leaves were from the Chocolate Baroque Tangled Garden stamp set (UA4SP0400) and some of the flowers were from the Fantasy Floral set (UA4SP0185). The rest of the leaves and flowers came from set UDLHC0100 FunkyDoodles - Fresh and set UDLCH0101 FunkyDoodles - Retro. After I had stamped everything I fussy cut it all out and then edged each one with a broad black Faber-Castell Pitt artist pen. I made sure that I covered up all the cut edges with the black ink so that I'd have a crisp outline. I further embellished some of the flowers and leaves with an Inkssentials white pen and a fine black Pitt pen.
 

Please click on the photos for a clearer view.
 
I then began the labourious task of layering everything onto the aqua panel using double sided tape and foam pads. Where leaves and flowers were overhanging the edges I trimmed them off flush. Some of the flowers and leaves were partially raised on foam pads and those in the foreground were raised completely. I stuck the panel to my card base using some strong red lined tape then finally I shaped the chandelier and adhered it with tape on the outer edges and foam strips in the middle.


This close-up photo gives you some idea of the dimension of the floral panel. The colours are much brighter in real life - unfortunately it was dark when I took my photographs and they appear more subdued.
 
Although I had started making my card early on Sunday afternoon, it took me much longer than I anticipated to complete it (over eleven hours in total), so I wasn't able to enter it into the challenge in the end. However, I enjoyed revisiting some of my older stamps and CASEing the rug photo and I shall be sending my card to a friend who has a birthday later this week. Thank you for looking!

Thursday, 29 May 2014

Stamped Emboss Resist and Watercolour Wash

I have four cards to show you today, all using the third technique taught in the recent online watercolour for card makers classes. All stamped background images were stamped with Versamark ink and heat embossed using Wow! Opaque Bright White Super Fine embossing powder. I then used my Winsor and Newton Cotman watercolour paint set to add a watercolour wash over each background. The white embossing acted as a resist and gave a lovely result.


For my first  card I stamped the Big Bold Background Belle Flowers by Chocolate Baroque (USQSP0407) onto Bockingford Watercolour paper and heat embossed. I used three colours of paint for the watercolour wash, which I did using a wet on wet technique. I layered the panel onto orange and blue card and a 6" square scalloped card blank. The Birthday die cut and wishes stamp are by Papertrey Ink and I added faux stitching with a Hot Off The Press stamp over the velum and orange card strip. Finally I embellished with a few sequins, which I stuck on with Ranger's Studio matte multi-medium.


My second card was made in much the same way, but this time using the largest stamp from Wendy Vecchi's Art Colors Life set (LCS053). I chose Purple Lake, blue and Viridian green paints for the watercolour wash and used Bockingford watercolour paper again. The "Happy" stamp is from Clearly Besotted's "Happy Everything" stamp set and the Birthday die cut is by Papertrey Ink. I also used sequins to embellish this one.
 
Please click on each photo for a better view.
 
For my third card I used the beautiful background stamp from Joanna Sheen's Tales of the Ocean - Fossil stamp set (JS317). Using Bockingford watercolour paper again I painted with a selection of coral, grey, yellow ochre and beige coloured paints, but this time I tried to keep within the shapes of each fossil, rather than blending the colours too much. The panel was mounted onto coral coloured card and a mottled beige C6 card blank. The sentiment stamp and die are from Clearly Besotted's Mini Basic Banners set and I used Memento London Fog ink. Once again I embellished my card with a few sequins (these came from Abakhan).


My last card is a lager 8" square one. This time I used smooth white card as I wanted to capture the detail from the lovely Big Bold Background Leafy Trails stamp by Chocolate Baroque (USQSP0406). For my wet on wet watercolour wash I chose Lemon Yellow, Sap Green and Viridian Hue paints and blended them together where they met. I used the same stamp and Memento Pear Tart ink to stamp the white card blank, layered the panel onto green card and added a die cut and stamped sentiment (from Papertrey Ink). Finally I embellished with two different sizes of pearls, which I placed where each berry was on the stamped image. I was really pleased with how this turned out - it looks so fresh in real life!