Showing posts with label Sizzix - Tim Holtz Alterations Texture fades. Show all posts

Tuesday, 26 April 2016

Altenew Beautiful Lady cards

Good morning! I'm back to share some more cards that I've made using Altenew's Beautiful Lady stamps and matching die. I found myself needing a lot of cards in March and April - and I didn't have a lot of time to make them all. So I came up with a basic design and made sixteen different cards by varying the colours, backgrounds and sentiments. All of the flowers were coloured with Copic Ciao markers. This post is rather photo heavy, but I wanted to show you all sixteen cards as they all have variations in spite of using the same set of stamps and die.


The first three cards were made in the same colourway, but I used different patterned papers for the background. The first had a stamped sentiment (all sentiments are from the same Altenew stamp set) on a Waltzingmouse stitched rectangle die. The next two had diecut sentiments by Spellbinders and the flowers were raised on foam tape.


My fourth card was a slightly different shade had an embossed hearts background and a stamped sentiment on a My Favourite Things stitched fishtail flag die.


My next card used the same hearts embossing folder for the background, but this time in a jade colour. The sentiment was stamped onto a Lil' inker stitched sentiment flag diecut. I love this little die and use it loads!


Next we have four similar pink cards, all using a Sizzix Tim Holtz Alterations Texture fades embossed background with various sentiments.


I also made four cards in a golden yellow and green colour combination. The backgrounds are made from a lovely green vellum with a gold sheen and were done using another Sizzix Tim Holtz Alterations Texture fades embossing folder. Two of the cards have Spellbinders diecut sentiments and two have stamped sentiments.


Finally I made three blue cards, this time using the Burlap Sizzix Tim Holtz Alterations Texture fades embossing folder for the backgrounds. Again Spellbinders dies were used for the sentiments. I found that the addition of some "Stick-It" to the back of the card before I cut the sentiments made it so much easier to adhere them to the card fronts - it's wonderful stuff!


I have to say that I am in love with Altenew's gorgeous stamps and dies, so you can expect to see a lot more made with their supplies here on my blog in future.

Lynn x

Saturday, 23 April 2016

Seven Hills Crafts April 2016 Colour Challenge

Hello again! Today I am taking part in the Seven Hills Crafts monthly craft challenge - you can find all the details here. The April challenge is a colour one, with three inspiration photos to choose from, all including blue.


  I opted to go for the third photo and chose the two shades of blue and the green for my three colours.


Here is my take on the challenge. I used a Sizzix Tim Holtz Alterations Texture Fades embossing folder for the background and layered it onto a darker blue card blank. The flower focal image is from Altenew's Beautiful Lady stamp set (available here), coloured with Copic Ciao markers and I used the co-ordinating die (available here) to cut it out . The sentiment is from the same stamp set and was popped up on some foam tape to add a bit more dimension. 

I'm really happy with how this turned out! Thanks for looking.

Lynn

Wednesday, 11 December 2013

Sherlock Holmes and the case of the card for Gentleman Jim

Firstly I must apologise for my lack of blogging recently. I have been making lots of things, but I can't show them to you just yet until their intended recipients have seen them!

This year our family have been gripped by all things Sherlock Homes and we're looking forward to the new series of the BBC's Sherlock coming soon (magnifying glasses at the ready)!

Back in June my daughter Jessica took part in an art exhibition at Hopwood Hall College in Rochdale, where she was studying a Foundation course in Fine Art. Her final major project was based upon Sherlock Holmes and included wall art, costumes, props and a huge six foot canvas. She painted a brick wall onto one of the walls of the exhibition space and added a cardboard drainpipe and a wooden hand painted street sign. The street sign now resides in our living room!


Jess made Sherlock's trademark deerstalker hat and cape from heavyweight tweed fabric, with a cream lining. The results were impressive as she hadn't done much sewing before and she managed to master buttonholes, lining and matching the patterns on all the seams.


A variety of props were displayed on the top of an old upright piano. Jess wanted her Sherlock to be more modern, so she substituted "Baskerville" brand cigarettes for Sherlock's pipe. I showed her how to alter old books by carving niches into them to hold the mock cigarette packet and lighter and we also made one to hide John Watson's revolver inside. The cut edges of the books were coated with Modge Podge to stick them together and the facing pages were open at relevant text relating to Sherlock Holmes. 


The most time consuming part of the exhibition was Jess' large canvas, which she constructed from a king size bed sheet stretched over a wooden frame and primed before painting. Earlier in the year we had been on a trip to London and had taken photos of Speedy's cafe near Euston Station, where the BBC had filmed part of it's Sherlock series. Jess' canvas shows the cafe, next to the entrance to 221B Baker Street. She added a black cab, as these have frequently featured in the series and are somewhat iconic in London. 


The exhibition was a huge success and Jessica passed her course with a distinction. She is now at University studying Creative Arts for Theatre and Film, where she gets to paint scenery and make costumes and props - what fun! We are so proud of her!
 
You can see more of Jessica's artwork on her own blog, Wild at Art,  here http://jwildart.tumblr.com/


 I bought a set of Sherlock Holmes stamps by Sam Poole for Creative Expressions as I knew I would get lots of use from them http://www.craftie-charlie.co.uk/creative-expressions-u-mount-rubber-stamps-sherlock-holmes-by-sam-poole.html . I recently made the card below for my friend Jim Hankins, also known as The Gentleman Crafter. Although Jim's birthday was at the end of November he has just received his card today, which is why I can now show it to you (I do wish it didn't take so long for post to reach the USA from the UK and vice versa).  Jim loves Architecture, anything Tim Holtz and Steampunk so I thought he would like this. I used Tim's Ranger distress inks to stamp the background with various small images and sentiments from the stamp set, and Tim's Sizzix brickwork Texture Fades embossing plate to make the brick wall on the left of the card. The wall was also coloured by rubbing it with various distress inkpads after it had been embossed. The Baker Street collage and the rather dapper gentleman were stamped onto smooth white card using Memento Tuxedo Black ink, coloured with watercolour pencils and mounted onto the card using foam pads. Finally I highlighted the watch face and the gentleman's top hat, shoes and cane with glossy accents.


If you get a chance I highly recommend that you also check out the lovely Jim's blog - http://www.thegentlemancrafter.com/  - be warned though - you will be amazed at some of his work and are likely to be there a while (best make a cup of tea or coffee first)! He is a very talented papercrafter and is kind, funny and an all round nice person to know!
 
Hopefully I will be back tomorrow with another birthday card to show you.

Thursday, 28 November 2013

Happy Thanksgiving!

Today is Thanksgiving in the USA, so I'd like to wish all my American friends a very happy Thanksgiving - I am truly thankful for you all!

Earlier this week I made this autumnal themed thank you card for a friend in America who had kindly sent me some lovely crafting goodies.


I started with a square black card blank and added a layer of black and cream paper from Graphic 45's Steampunk Spells Patterns & Solids pad. Another layer of cream card was added with a stamped sentiment from the Waltzingmouse "Blessed By You" stamp set (I actually used parts of two different sentiments to get this particular combination). I embossed a small square of Core'dinations Chocolate Box collection card using a Tim Holtz Alterations Texture Fades embossing folder by Sizzix and sanded the card to reveal the coloured core inside. The oak and acorn wreath and sprigs from "Peace and plenty" by Waltzingmouse stamps were stamped onto cream card using black Memento ink. I coloured all the images with Copic Ciao markers and cut them out by hand before mounting them onto the card front using foam pads. Finally I highlighted all the acorns by giving them a coat of Ranger's Glossy Accents.

The photo above doesn't really do justice to the card as the colours were much brighter in real life. Poor daylight in the winter in England isn't really conducive to photography! I hope my friend liked it though.

Monday, 11 November 2013

Core'dinations Hard Core Crop Challenges.

Core'dinations are holding a series of challenges this week and as usual I am at the last minute to get my entries in. I was late finding out about these challenges, but as I love using Core'dinations card I just had to join in.

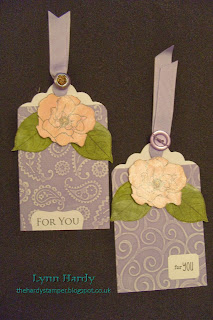
The first is for Kate Nolan's challenge - two stamped tags. I used two different Cuttlebug embossing folders to emboss patterns into two pieces of lavender coloured Core'dinations card then sanded the raised areas to reveal the lighter coloured core. These were then added to two tags along with some lavender coloured grossgrain ribbon, which I attached by tying buttons on with twine. The "For You" sentiments are both by Waltzingmouse stamps and were stamped onto white card which I cut to shape using Spellbinders dies.  The roses and leaves are from the "Roses in Bloom" stamp set by Waltzingmouse stamps.They were stamped onto white card, painted using watercolour paints which contain mica, fussy cut out then adhered to the tags using double sided tape for the leaves and foam pads for the roses to give them some dimension. Finally, you can't see on the photo, but I stamped "To" and "From" on the back of the tags, so that they are all ready to be used.


The second entry is for Tami Mayberry's CAS card challenge. I don't usually do "Clean and Simple" cards - mine are usually more elaborate creations and often take me many hours to make! CAS is a great idea for Christmas cards though, as it's much easier to make them in batches if the design is quick to produce. Here I used a piece of Kraft card to make the base of the card and then added a single layer of red Core'dinations card which I had embossed with a Cuttlebug embossing folder and sanded to reveal the paler core as before. I chose Memento Ladybug red ink to stamp the sentiment and ornament onto kraft card, which I then cut out using Spellbinders dies. Both stamps are from the "Vintage Ornaments" stamp set by Waltzingmouse Stamps - I love these as they all have corresponding Spellbinders dies and it makes it so easy to get great results! I used foam pads to raise up the ornament on the card, then embellished it with a row of sparkly red diamantes. It's at this point that I wanted to start adding ribbon etc, but we were only allowed to use no more than two embellishments, so that's it - my first ever CAS card!


My third entry is for Gail Linder's Patchwork inspired background challenge. This one is totally not clean and simple! In fact it took me well over eight hours to make but I am very pleased with the result. I selected seven different colours of Core'dinations card stock from the Whitewash collection and die cut them all with my Papertrey Ink "Happy Hexagons" coverplate. I decided to use the cream coloured one for the background grid, which I stuck to another layer of similar coloured card using double sided tape. Next I pushed out all of the little hexagons, half hexagons and triangles from the other six die cuts and embossed them all with a variety of embossing folders which had small designs. Each individual piece was then sanded to reveal the darker coloured core, which took ages, and as you can imagine I had sore fingers for a while too! The next step was to insert the hexagon shapes back into the grid, forming the lovely patchwork design for the background. This was then layered onto a piece of pale blue Core'dinations card, which I had sanded around the edge. The panel was then added to a white card blank and embellished with a narrow stitched ribbon and a sewing machine charm. I used the leftover bits of Core'dinations card to die cut the dress form with Spellbinders "S5 - 145 French Frills" dies. It's hard to tell in the photo, but the dress was then stamped using one of the co-ordinating stamps by Samantha Walker for JustRite Stampers (SW - 04105 Ooh La La French Frills) and Papertrey Ink's Fresh Snow ink. The buttons and scissors were also cut from scraps of Core'dinations card with Spellbinders dies and the needle and spool were made with Memory Box dies. I threaded the needle with baker's twine (which was then adhered to the card with double sided tape), used the same twine to "sew" the buttons and also wrapped some of it around the spool, before sticking everything onto the card using foam pads to add dimension. Finally I diecut another small hexagon, this time using the smallest Spellbinders hexagon die, stamped the sentiment (from JustRite Stampers) on it and stuck it in the top left of the card (again using a foam pad).  I really enjoyed making this card and have enough "bits" left over to make a few more with different coloured hexagonal grids. I am planning to send this one to a friend who loves sewing and who has a birthday next week - I hope she likes it!


The final card is for Clare Buswell's Quick and easy Christmas cards challenge.  Clare has just secured a place on the 2014 Design Team for Craft Stamper magazine - which was how I came to check out her blog and discover these challenges. I have much admired Clare's work previously - she used to be on the Waltzingmouse Stamps Design Team until recently and has some beautiful cards on her blog http://clare-buswell.blogspot.co.uk/ . I am really looking forward to seeing more of her wonderful creations in Craft Stamper next year.

I started off with a square kraft card blank and added a square layer of gold textured card. Then I selected a dark green sheet of Tim Holtz Kraft-Core from the Shattered collection and embossed it with the December Calendar folder from the Tim Holtz Alterations Texture Fades (by Sizzix). I also embossed a strip of "Old Paper" coloured Core'dinations card from the Tim Holtz and Ranger Distress collection, using the music border folder from Tim's smaller Texture Trades set. Both pieces were then sanded to reveal the core and layered onto the card base (on top of the gold layer). My chosen stamps were all from the "Santa's Coming to Town" set by Waltzingmouse Stamps. I filled the gap at the bottom left with the sillouette of Santa and the snippet of lyrics from the Christmas song (I used Memento Northern Pine ink). I chose a vivid red from the Core'dinations Brights collection to diecut my ornament shape with a Spellbinders die, then I stamped it with the co-ordinating image and sentiment using Memento Tuxedo Black ink. A thin strip of the gold card was attached to "hang" the bauble from (again using foam pads for dimension). I think the calendar looks really effective and I might make some more cards similar to this for Christmas.


EDITED: To add that the above Christmas card was chosen as the winning entry on Clare's blog. I am thrilled and have won a 12" x 12" Tim Holtz Seasonal Impressions Core'dinations card pack!
 
I really enjoyed taking part in these challenges and would have liked to have done more of them, but there were sixteen in total and I just didn't have the time. I hope that you like the four that I managed to finish!