Showing posts with label Winsor & Newton Cotman Watercolour paints. Show all posts

Friday, 3 August 2018

Watercolour animal quartet cards

Hello and welcome! Today I'm sharing some more cards made with watercolour paintings which I did as part of the Simply Watercolor Online card class. Kristina Werner's example was a painting of a dog, cat, fox and tiger but I had lots of ideas for different quartets of animals and I came up with the following three cards.


My first card has two cats and two dogs and they all seem to be getting along just fine! For all three cards I started with a 6" square panel of Bockingford cold pressed watercolour paper and used my Winsor & Newton Cotman watercolour paint pans and white gouache paint.


  My second card features a hippo, a bird and a pair of sheep and I added a handwritten sentiment which reads "Hippo Birdie 2 You"! Fun right?


Finally I went with a woodland theme and painted a badger, fox, owl and a rabbit (at least that's what I intended, but I think that my rabbit looks a little mouse like). Obviously I need to practise a bit more!

Thanks for looking.

Friday, 27 July 2018

Watercoloured bird with balloons

Hello and welcome. I am currently taking Kristina Werner's Simply Watercolor Online Card Class and although we aren't using any stamps or dies, I'm really enjoying stepping outside of my comfort zone and just painting.

The lessons for day 2 are all about painting simple critters and animals. Kristina's examples are all whimsical and fun (which is just as well, as I'm hopeless at drawing really lifelike animals). For the card below I started by making a card blank from some Bockingford cold pressed watercolour paper, taped it to my board and painted directly onto it using my Winsor & Newton Cotman watercolour paint pans. Extra details and the sentiment were added with a fine black PITT artist pen and my cute little bird is now ready to wing his way to one of my friends!


Thanks for looking. 

Thursday, 26 July 2018

Watercolour word block - HOME

Hello and welcome back - this is my sixth post for today!

The card below was created for the Simply Watercolor Online card Class. I followed guest tutor Julie Ebersole's lesson video and then painted the word HOME in a block, using my Winsor & Newton Cotman watercolour paints. I added lots of individual bricks and mortar, a grey roof shape and painted some of the spaces a pale blue colour to represent windows. The sentiment and outlining of the large letters was done using sepia and black PITT artist pens by Faber Castell.


This was one of my favourite cards to paint as I loved all the details! I have one further post to follow with a similarly themed Christmas card. Thanks for looking.

Watercolour word block - LOVE

Hello again - yes, you are not seeing things, this is my fourth post for today!

I am currently taking the Simply Watercolor Online Card Class and the first day's lessons are covering Patterns and Backgrounds. Guest designer Julie Ebersole created a card with the four lettered word FAVE painted in a block, using a wet on wet painting technique. For my first attempt I decided to use the word LOVE and my Winsor & Newton Cotman watercolour paint pans. The letters are edged with a silver POSCA paint pen and additional lettering added with a Faber Castell fine black PITT artist pen.


I could see so much potential for this type of card and so I ended up making a further three cards in a similar style (but with added details).  Further posts to follow!

Tuesday, 2 February 2016

Watercolour Paint Swatches

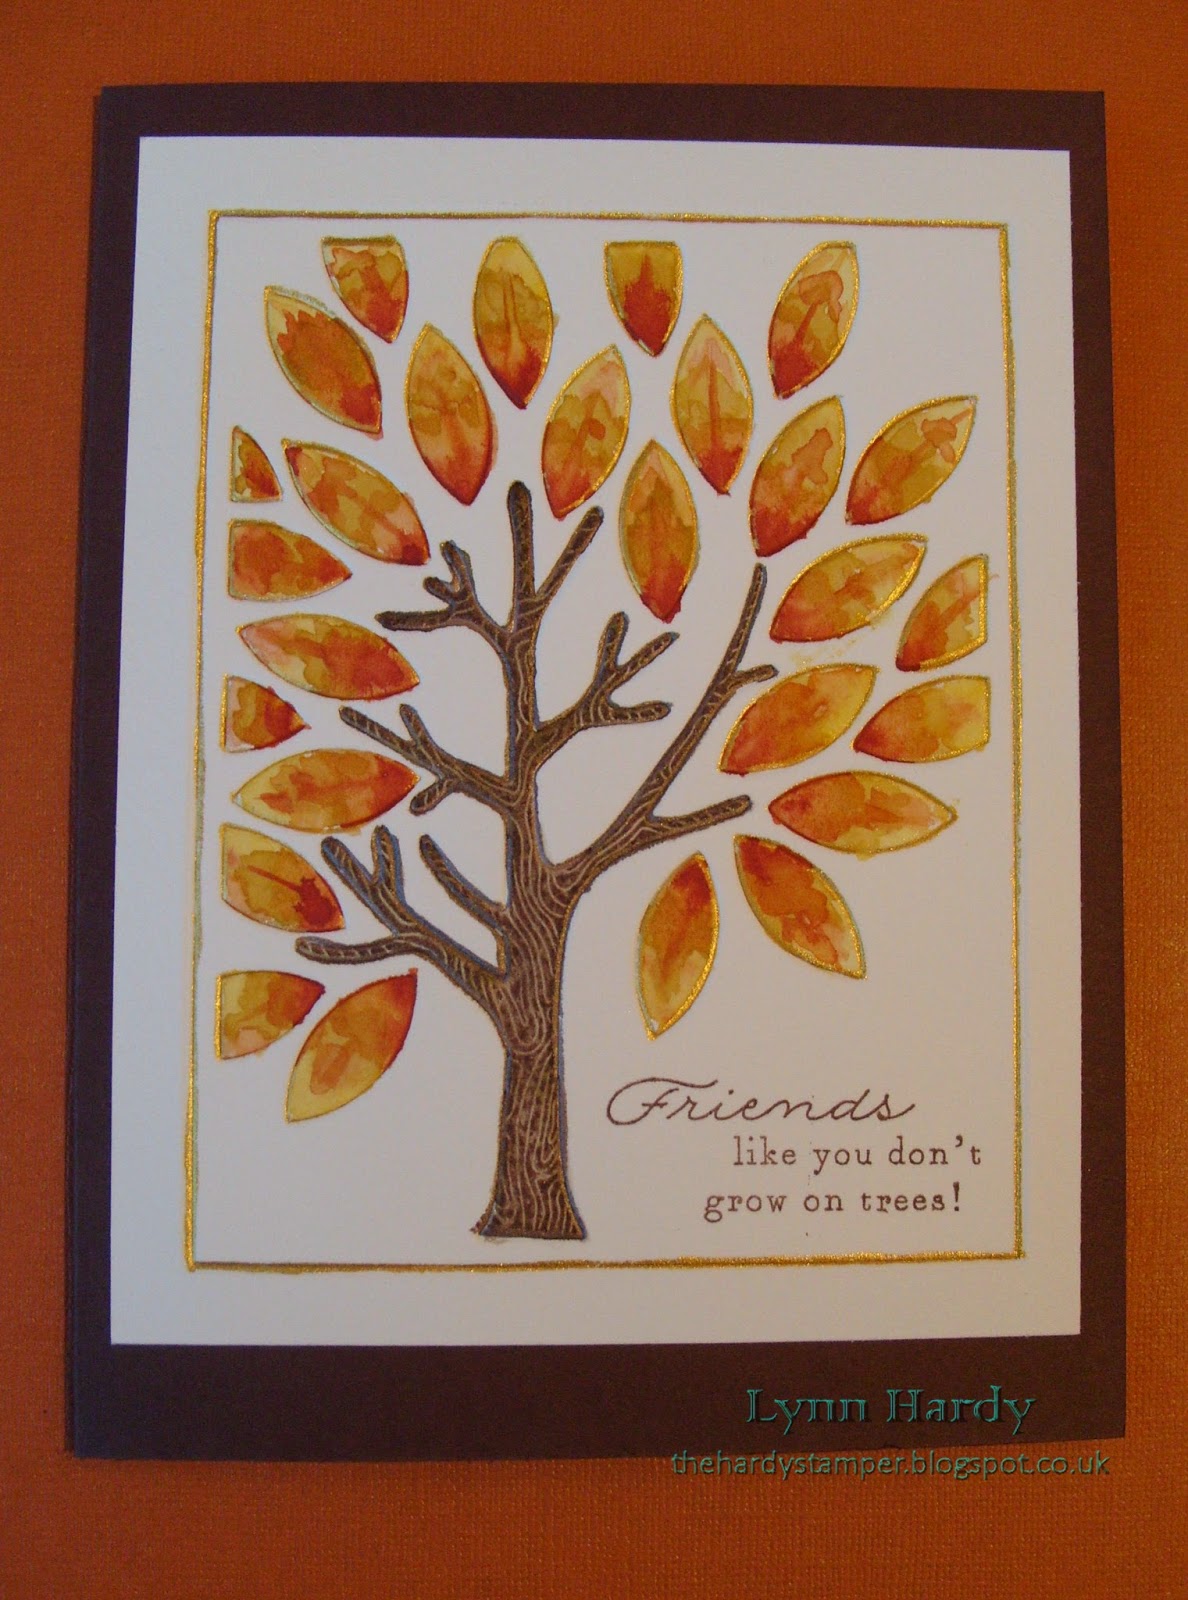
Hello and a very belated Happy New Year to you all! Sorry for my lack of blogging recently - I have actually made several cards but haven't had time to show them on my blog yet.

I am currently participating in a fabulous Online Card Class, Watercolour for card makers - Intermediate Techniques.This was part of my Christmas gift from my lovely husband, who also bought me a beautiful set of 36 Japanese Gansai Tambi watercolour paints, a colouring book and some die storage drawers - I'm so lucky!


The teacher, Dawn Woleslage (of Wplus9 fame), set a series of Pre-Class exercises to help us to familiarise ourselves with the properties of our own particular paints. First of all we were advised to make paint swatches of all of our watercolour paints, to enable us to better assess their individual qualities. I painstakingly transferred the swatch charts onto Bockingford 140lb Cold Press watercolour paper using pencil and Black Faber Castel Pitt artist pens (waterproof India Ink). The thick black line within each rectangle is used to establish whether the colours are Transparent, Semi - Transparent or Opaque. One coat of each colour paint was applied to the whole area, then a second coat was added only to the right side of each rectangle to show how the colours become deeper with a second layer of paint.


My first swatch chart shows my new Japanese Gansai Tambi paints from Kuretake. They are deeply pigmented and I love the vibrant colours! As an added bonus there are three metallic paints included too.


My second swatch chart was painted using my set of 24 Winsor and Newton Cotman pan paints - also a gift from my husband several years ago. This is my trusty set, which I used to paint landscapes etc when I attended evening classes a couple of years ago. The Cotman range are student grade watercolours which tend to be not so translucent, due to the quantity of binders used during production.


Out of curiosity I purchased a few tubes of Winsor and Newton's Professional watercolour paints to see how they compared to my student grade Cotman set. My third swatch chart below shows these, although I only have 14 colours at the moment. I deliberately left spaces on my chart to include future purchases when I can add to my collection (although there are actually 96 colours in the range, so this may take a while)! The difference in quality was immediately noticeable, with the paints having a more delicate feel to them due to their translucent properties. This makes them much more suitable for techniques such as glazing, where paint is layered. I am looking forward to becoming more familiar with these paints, which I think will be ideal for botanical type paintings.


Thank you for reading this far and I shall be back soon with some completed colour mixing exercises.

Lynn

Wednesday, 26 November 2014

Cure For The Monday Blues Challenge # 35 - Leaves an Impression.

Today I am joining in with Taheerah's Cure for the Monday Blues Challenge #35. You can find all the details on her blog here . This week the inspiration photo shows a dining room with a delightful chandelier bedecked with falling autumn leaves, so I took the leaves as the starting point for my card.


I started by embossing the Papertrey Mighty Oak coverplate onto some Bockingford Watercolour paper. Then I took a very fine paintbrush and painted all the outlines with Rich Cocoa and Solar Gold Twinkling H20 paints. When this had dried I used my regular watercolour paints to colour the tree trunk and autumn leaves, varying the colours of the leaves as I went. The tree trunk was then overstamped with the corresponding stamp from the Mighty Oak stamp set (this is such a lovely set and I'm sure I will be using it lots more in the future too). The sentiment (from the same stamp set) was added with Rich Cocoa Memento dye ink. The entire panel was then simply added to a Dark Chocolate card blank with lots of strong double sided tape to prevent warping.

Please click on the photo above for a larger view. 

I am thrilled with how this card turned out! It's certainly unique and an added bonus was that it was flat for posting. It has already been sent off to a dear friend in the USA - I hope that they like it too!

Thanks for looking,

Lynn.

Thursday, 29 May 2014

Stamped Emboss Resist and Watercolour Wash

I have four cards to show you today, all using the third technique taught in the recent online watercolour for card makers classes. All stamped background images were stamped with Versamark ink and heat embossed using Wow! Opaque Bright White Super Fine embossing powder. I then used my Winsor and Newton Cotman watercolour paint set to add a watercolour wash over each background. The white embossing acted as a resist and gave a lovely result.


For my first  card I stamped the Big Bold Background Belle Flowers by Chocolate Baroque (USQSP0407) onto Bockingford Watercolour paper and heat embossed. I used three colours of paint for the watercolour wash, which I did using a wet on wet technique. I layered the panel onto orange and blue card and a 6" square scalloped card blank. The Birthday die cut and wishes stamp are by Papertrey Ink and I added faux stitching with a Hot Off The Press stamp over the velum and orange card strip. Finally I embellished with a few sequins, which I stuck on with Ranger's Studio matte multi-medium.


My second card was made in much the same way, but this time using the largest stamp from Wendy Vecchi's Art Colors Life set (LCS053). I chose Purple Lake, blue and Viridian green paints for the watercolour wash and used Bockingford watercolour paper again. The "Happy" stamp is from Clearly Besotted's "Happy Everything" stamp set and the Birthday die cut is by Papertrey Ink. I also used sequins to embellish this one.
 
Please click on each photo for a better view.
 
For my third card I used the beautiful background stamp from Joanna Sheen's Tales of the Ocean - Fossil stamp set (JS317). Using Bockingford watercolour paper again I painted with a selection of coral, grey, yellow ochre and beige coloured paints, but this time I tried to keep within the shapes of each fossil, rather than blending the colours too much. The panel was mounted onto coral coloured card and a mottled beige C6 card blank. The sentiment stamp and die are from Clearly Besotted's Mini Basic Banners set and I used Memento London Fog ink. Once again I embellished my card with a few sequins (these came from Abakhan).


My last card is a lager 8" square one. This time I used smooth white card as I wanted to capture the detail from the lovely Big Bold Background Leafy Trails stamp by Chocolate Baroque (USQSP0406). For my wet on wet watercolour wash I chose Lemon Yellow, Sap Green and Viridian Hue paints and blended them together where they met. I used the same stamp and Memento Pear Tart ink to stamp the white card blank, layered the panel onto green card and added a die cut and stamped sentiment (from Papertrey Ink). Finally I embellished with two different sizes of pearls, which I placed where each berry was on the stamped image. I was really pleased with how this turned out - it looks so fresh in real life!

Friday, 23 May 2014

Soft Watercolour Wash Background (with Stencils) - part 4


My final card in this series from lesson one in the watercolour for cardmakers online class is a bright one, done with The Crafters Workshop Mini Marakesh stencil and yellow and blue paints. These produced a lovely range of green colours when they mixed together on the wet paper.

Please click on the photo above for a clearer view.
 
I simply trimmed and mounted my square background panel onto a black 6" square card blank and added a couple of strips of blue and yellow card to ground my sentiment. I added a row of hand stitching to the edge of my card strips then added a black die cut sentiment from a Sizzix die. I think that this flat card will be ideal for posting but still has some interesting details.


Soft Watercolour Wash Background (with Stencils) - part 3

 
My fourth card in this series is a slightly larger one - this time using The Crafters Workshop Mini Cherry Blossoms stencil. I wanted to see if I could watercolour a background which wasn't quite so abstract, so I chose this stencil of birds sitting in a cherry tree and used pale blues, green, brown and pink paints. The pooling of the watercolour paint in the spaces left by the stencil gave a lovely edge to the flowers but the birds weren't very clear, so I decided to die cut a flock of them using Memory Box dies instead. I mounted each bird onto my card with tiny foam pads, so that they look like they are perching on the branches or flying.

Please click on the photo above for a better view.
 
The sentiment is another from the useful Clearly Besotted "Many Thanks" set. I stamped it straight onto the background using Potting Soil Archival Ink. I really like the subtle, dreamy quality to this card!

Thursday, 22 May 2014

Soft Watercolour Wash Background (with Stencils) - part 2


My next card using the watercolour and stencil technique is a softer colour palette of blues, lavenders and lilacs. I chose The Crafters Workshop Mini Cubist stencil and the result reminds me a little of the works of Gustav Klimt - what do you think?

Please click on the photo for a better view.

I found the die cut banner in my stash (I think it's a Sizzix one). The sentiment is from the "Many Thanks" set by Clearly Besotted and I curved it slightly on my acrylic block, so that it fitted nicely onto the banner. I heat embossed the sentiment with Wow! Opaque Pastel Purple and mounted the banner to my card with foam pads. Finally I embellished the card with a few tiny blue and lilac gems. I was really pleased with how this one turned out and would definitely recommend using this particular stencil for this technique.

I'll be back shortly with the next card in this series.

Soft Watercolour Wash Background (with Stencils) - part 1

I have been taking an online class, Watercolour for card makers, and have been trying out lots of different techniques. Some are new to me and others I'm revisiting - but all have been lots of fun! We were set homework after each day, so my next few posts will be showing what I made for that - thankfully none of my assignments look like the dog has eaten them!


The first lesson on day 1 was to make soft watercolour wash backgrounds using stencils. I got carried away with trying out different stencils for this and ended up making five cards using this technique. For my first card I used a Tim Holtz layering stencil - Burlap (THS007) and a selection of brown shades of watercolour paint on Strathmore Bristol smooth paper.


The tag was stamped with a sentiment from Kaisercraft (from their Friendship Sentiments set) and this was heat embossed using Zing Chestnut embossing powder. I added a bow from button twine to echo Jennifer Rzasa's original design, but I felt that it needed a little more embellishment, so I added three small gold mosaic tiles.


My second card was made in a similar way, but using The Crafters Workshop Mini Basketweave stencil and yellow and red paints. This is very vibrant in real life and looked good on a black card blank. The sentiment is from Waltzingmouse Stamps' Compact Sentiments set and the small heart is from their Sweethearts set - I heat embossed them both using Wow! Black Glint embossing glitter. You can't see in the photo, but it's actually really sparkly! The die cut camera was mounted with foam pads for extra dimension.
 
 
I'll be back later with a few more cards. Thanks for looking.