Showing posts with label Papertrey Ink. Show all posts

Monday, 25 May 2015

Birthday cards

It was my birthday last month, so I thought I'd show you some of the lovely hand made cards that I was lucky enough to receive from family and friends.


This lovely cat looking out of a window was sent to me by my Auntie Annette, who is on the Design Team for Imagination Crafts.


This beautiful yellow floral card was made by my friend Chris, using Papertrey Ink Stamps.


This lovely oriental card came from my friend Lesley, who knows that I love birds.


This one was from my sister Maria.


I just love this cute chick made for me by my sweet grandsons Max (age 3) and Lucas (age 7 months)!


This gorgeous floral card came from my sweet friend Neet. I love the colour scheme.


Finally, this beautifully coloured shaker card was made by my lovely friend Penny. Isn't that Crazy Bird fun?! I am thrilled with all the lovely cards that I received - thank you all very much! 

Now for another card that I made recently, using Norma J. Burnell's Mid Summer Dragonflies stamp, from Sweet Pea Stamps. I used VersaFine Onyx Black ink and Strathmore Bristol Smooth paper, which I cut with a Lawn Fawn stitched rectangle die. I then watercoloured the image with Distress Markers and added a hint of shimmer to the dragonflies with my Wink of Stella pen. The background is Core'dinations card embossed with the "Rosa" embossing folder by Anna Griffin for Cuttlebug, then sanded back. The birthday diecuts are from Papertrey with the sentiment flags being from a Lil' inker die.


Thanks for looking. I shall try not to leave it so long before posting next time!

Lynn

Friday, 27 March 2015

Word Dies and Heat Shrink Craft Foam.

I am currently taking part in the Online Card Class "Stretch Your Dies" which is run by Jennifer McGuire and Kristina Werner. The lessons are spread over seven days and there are loads of useful tips and galleries full of inspiration. I was late to the party, due to ongoing problems with our broadband connection and not being able to view the video classes until recently - but I plan to work my way through all of them and post my cards here as I get time.

The very first lesson was a video by the very talented Jennifer McGuire, showing how to use word dies to create a tone on tone background and how to make fun little embellishments out of die cut Craft Foam. Here is my finished card. It was very time consuming to make (I was fiddling with it for about three days), but I am so pleased with the finished result!
I started with a black C6 card blank and used WOW opaque white embossing powder to heat emboss the long border stamp from Waltzingmouse Stamps "My Heart" set down the left hand side. The white background panel was made using several die cuts from a Papertrey Ink Birthday die (I used Stick It on the back of my card before cutting each word out, so that they would be easier to adhere to my card). I added a strip of gold foil and mounted the panel onto a rectangle of white craft foam, before adding it to the card.


Then I got rather carried away die cutting all these individual small flowers and leaves from Craft Foam! I used a selection of dies from Papertrey Ink, Waltzingmouse, Impression Obsession, Magnolia, Poppystamps, X-cut and Simon Says Stamp.


Next came the fun part! I used my heat gun to heat shrink the flowers and leaves until they were much smaller. The Birthday word was cut from black foam and shrunk in the same way. The photo below shows the foam before it was shrunk on the top row, with the smaller heat shrunk versions below.


I stuck everything to the card front using Ranger's multi - medium matte and added pearls as a finishing touch. 

Thanks for looking!

Lynn

Sunday, 22 March 2015

Cure for the Monday blues # 46 - Rise & Shine!

Hello there! I have been having trouble with our internet connection this week and haven't been able to post on my blog for what seems like ages! I've made a card for the Cure for the Monday Blues challenge # 46 - Rise & Shine! You can find all the details on Taheerah's blog here . The inspiration photo this week has a monochrome palette with a pop of yellow here and there.


I decided to focus on the yellow pillow with clouds and the sweet little bird - and here's what I came up with.


I started with a white card blank and added a layer of Papertrey's Soft Stone card followed by a layer of Lemon Tart card. Then I diecut several white clouds using my Memory Box Marshmallow Clouds dies, stuck them to the yellow card and trimmed the edges. The cute bird and sentiment are both from Waltzingmouse Stamps Sewing Box Hugs stamp set. I used Memento Tuxedo Black dye ink to stamp the bird three times onto Soft Stone and Lemon Tart bitty dots papers, cut them out and layered them up with clear foam tape. That's it - so CAS for me, LOL!

Thanks for reading and for your kind comments,

Lynn

Sunday, 8 February 2015

Catching up!

It is such a long time since I last blogged - so sorry that I've been AWOL for so long! December saw me frantically making several birthday and thank you cards, together with over 100 Christmas cards - which then had to be written and posted, so there was no time to write blog posts at all. Over the Christmas and New Year period we were busy entertaining our family and friends, then we came down with the dreaded lurgey and were forced to retreat to bed to hibernate until we felt better.

Anyway, now that things are getting back to normal, I thought that I would share a few photos of some of the cards that I made over the last couple of months.

The first one is a thank you card made with a Lili of the Valley cute image stamp and papers, Spellbinders dies and sentiments by Waltzingmouse Stamps. We took this to the Stroke Unit at Fairfield Hospital, Bury to thank the staff there for looking after my husband David when he first had his stroke last year.


My second card was for my Brother-in-law Les' 80th birthday. He loves the countryside and there are squirrels in the trees behind their house, so I decided to go with a woodland themed card. I used a Spellbinders embossing folder for the green background panel which I added to a 5" x 7" white card blank. I embossed the Papertrey Ink tree cover plate onto Bockingford watercolour paper, watercoloured the tree trunk and leaves, then stamped the trunk with the co-ordinating PTI stamp to get the bark effect. The tree panel was matted onto chocolate brown card, which I also used to cut some branches and an assortment of small birds with a selection of Memory Box and Poppystamps dies. The squirrels and acorns were cut with Impression Obsession dies, then I highlighted the acorns and the squirrels' eyes with a tiny amount of glossy accents. I was really pleased with how this turned out.


The next card was made for my Sister-in-law Alison for her birthday. I used a similar technique to the previous card, this time using a Papertrey floral coverplate and watercolouring as before. The small stitched flag was cut using a Li'l Inker die and stamped with a Waltzingmouse stamps sentiment. Lime green and pink card layers and some co-ordinating ribbons were all that were needed to complete my design.


Below you can see a similar version of the card above, this time using Papertrey Bitty Dot background paper and matching ribbon, with an orange and lime green colour scheme.


My next card was designed to be produced en mass and was based upon a card that had been featured on the Less is More challenge blog. The stitched rectangle die is from a set of Lawn Fawn dies, the sentiment is a Magenta stamp, the snowflakes are by Waltzingmouse stamps and the legs are part of a Prima Valentine doll stamp. I used Memento dye inks and Copic Ciao markers to colour the legs and shoes, adding a touch of clear Wink of Stella pen to the shoes to make them sparkle. The snowflakes were stamped with Versamark ink and heat embossed with WOW sparkling embossing powder. I made a total of 65 of these C6 sized cards - which took me ages!


Finally we have my other batch Christmas card for 2014. I made about 35 of these 6" square green cards and stamped the backgrounds using red Memento dye ink and a candy stamp from Waltzingmouse. Then came a red linen card layer and a square of mottled green card embossed with a Cuttlebug candy cane embossing folder. The striped candy canes, bow and gingerbread man were all Waltzingmouse stamps, cut with their matching dies and coloured with Copic Ciao markers. A touch of red and white bakers twine completed the look.


Apologies for the long post and thanks for reading this far!

Lynn


Wednesday, 26 November 2014

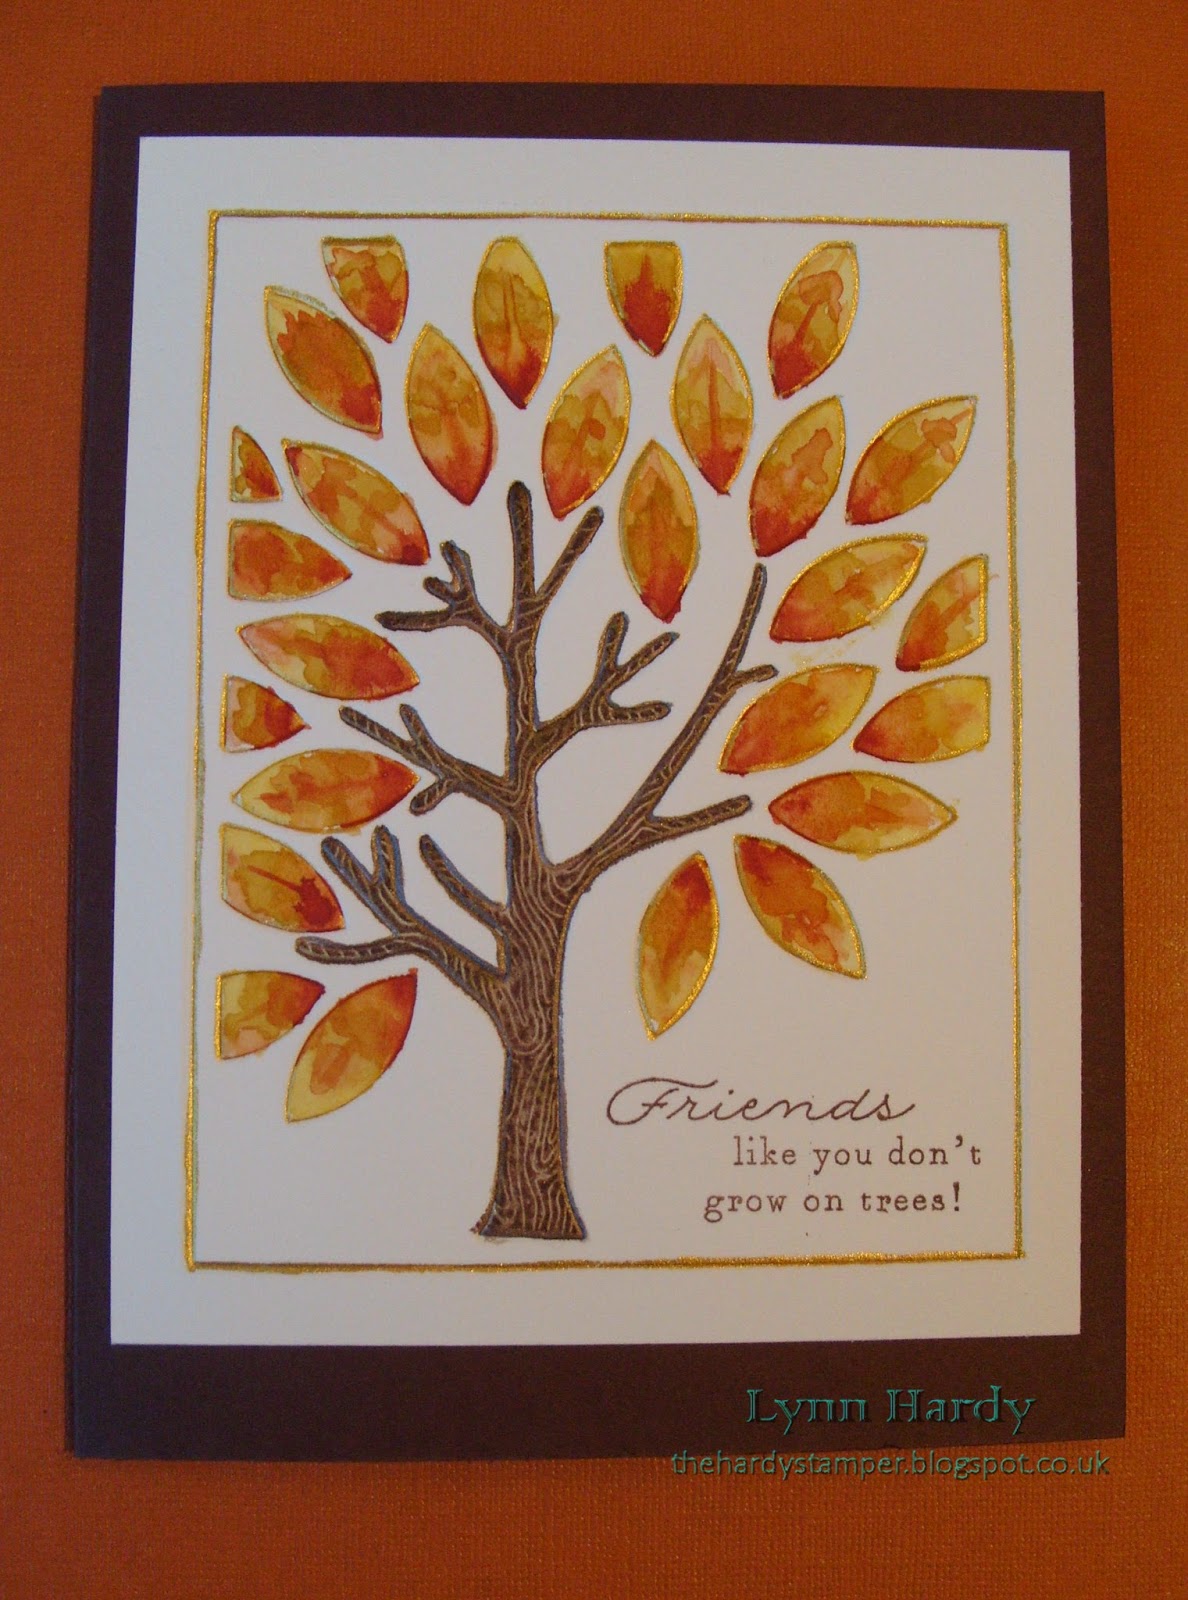
Cure For The Monday Blues Challenge # 35 - Leaves an Impression.

Today I am joining in with Taheerah's Cure for the Monday Blues Challenge #35. You can find all the details on her blog here . This week the inspiration photo shows a dining room with a delightful chandelier bedecked with falling autumn leaves, so I took the leaves as the starting point for my card.


I started by embossing the Papertrey Mighty Oak coverplate onto some Bockingford Watercolour paper. Then I took a very fine paintbrush and painted all the outlines with Rich Cocoa and Solar Gold Twinkling H20 paints. When this had dried I used my regular watercolour paints to colour the tree trunk and autumn leaves, varying the colours of the leaves as I went. The tree trunk was then overstamped with the corresponding stamp from the Mighty Oak stamp set (this is such a lovely set and I'm sure I will be using it lots more in the future too). The sentiment (from the same stamp set) was added with Rich Cocoa Memento dye ink. The entire panel was then simply added to a Dark Chocolate card blank with lots of strong double sided tape to prevent warping.

Please click on the photo above for a larger view. 

I am thrilled with how this card turned out! It's certainly unique and an added bonus was that it was flat for posting. It has already been sent off to a dear friend in the USA - I hope that they like it too!

Thanks for looking,

Lynn.

Monday, 17 November 2014

Papertrey ink Make it Monday challenge # 188: Stamping Ombre Backgrounds

Over at the Papertrey blog Laura Bassen has a video tutorial and a challenge for stamping ombre backgrounds - you can check out all the details and the video here .

I am joining in the challenge today with a tent fold A5 size card, using the Papertrey ink Rustic Snowflakes stamp set for the ombre background and the Shape Up Snowman dies and matching accessories stamps for my focal point.

Please click on the photo for an enlarged view. 

Using the long solid snowflake stamp I stamped the background in eight different colours, overlapping them slightly as I went. I chose (from top to bottom) Enchanted Evening, Blueberry Sky, Spring Rain, Sweet Blush, Lavender Moon, Plum Pudding, Royal Velvet and True Black inks on white card. I trimmed the panel and layered it onto some mottled grey card before adhering to my card blank. The sentiment (also from the Rustic Snowflakes set) was stamped in black onto a banner cut from the mottled grey card then added to the card with foam tape.

The snowman and accessories were diecut from white card then stamped in coordinating colours. I added a touch of Orange Zest ink for his carrot nose too. His twig arms were diecut from Dark Chocolate card. I used double sided tape to assemble him and stick him to the card base, with some extra foam tape for the top of his hat and his mittens. I drew the "string" holding his mittens with a fine blue marker pen and painted his three buttons with a little Spring Rain ink. 

I'm really happy with how my snowman card turned out - I hope you like it too!

Lynn.

Tuesday, 4 November 2014

Couture Birthday Card

I have just realised that I didn't share the twenty - first card that I made for my daughter back in the summer, so it's time to put that right! Jess is studying Costume as part of her University course - so what better papers to use than the wonderful Graphic 45 Couture collection?

A word of warning though - if you are a fan of clean and simple (CAS) cards please look away now! Clean and simple this is not! In fact I would go as far as to say that this is one of the most elaborate cards that I have ever made and it took me several days to complete. To give you some idea, there were a total of twenty - two different dies used on this card - some of them more than once!

I started off with an A5 card blank, portrait style, with a top fold. I added fleur-de-lis borders to the longer sides, which I had cut from black glitter card using a Spellbinders die. Then came a layer of turquoise pearlescent card, followed by several panels of the Couture papers by Graphic 45. The ric-rac border at the bottom of the card was cut using a Papertrey die and I used a white gel pen to add the faux stitching.


The next two photos show the top of the card, where I wanted to hang bunting to create a party feel. I used three of the dies from JustRite's Buntings and Button dies set with more of the lovely Couture papers to make the pennants and scalloped bunting. These were layered using clear foam tape then tied together with narrow black polka dot ribbon, forming six tiny bows. 


The top pelmet of turquoise hearts was cut from a Memory Box die and topped with a Spellbinders Fleur-de-lis in black glitter card. The photo below shows how I used several black foam dots to raise the centre of the pelmet to give it a curved shape. Two small ribbon bows were added to the ends to make it look like the ribbon had been used to tie up the bunting.


The main stamped image is one of the Prima doll stamps by Julie Nutting, which I stamped, coloured with Copic Markers, paper pieced and decoupaged. I heat embossed the dress portion of the stamp four times onto another of the Couture papers, fussy cut them and decoupaged the layers with clear foam pads at the bust and hemline. I also added some tulle netting gathered at the hemline to make it a real party frock! The party hat, bow belt and shoes were also decoupaged and I painted them with some Tattered Angels Tide Pool Glimmer Glam Glitter paint for added sparkle. Three turquoise gems completed the party crown and some narrow gold beaded trim made the perfect necklace and bracelet - every party girl needs a bit of bling!


The photo below shows the dimension achieved from all the layering on the skirt of the dress (sorry it's a bit out of focus).


The panel for the sentiment was cut from two more Couture papers using Spellbinders labels dies. I added a larger Fleur-de-lis to the top and bottom of the panel and mounted it onto the card with foam tape. The "happy" die cut is from a Simon Says Stamp die and the numbers and letters are all cut using Memory Box Classic number and alphabet dies (both upper and lower case).


The bottom right of the card was finished off with a bouquet of co-ordinating flowers. The white gypsophila, turquoise blossoms and variegated leaves were from Wild Orchid. I made the six other flowers myself using Spellbinders Bitty Blossoms dies and more of the Couture papers. I used a cocktail stick to curl all the petals before securing with glue, then I added either a tiny turquoise pearl or a gem to the centre of each flower. A couple of diecut flourishes completed the arrangement.


The photo below gives you some idea of the dimension added (sorry it's a bit out of focus again).


A final look at the finished card. I was so happy with how this turned out and my daughter loved it too!


Thanks for looking.

Lynn

Thursday, 30 October 2014

Pink Roses and Sequins

This week I have been busy card making as I need quite a few cards for various occasions over the next few weeks and I wanted to make a start on them before I begin making Christmas cards. I decided to make a batch of similar cards and started by cutting shaped card blanks from pearlised linen textured card using a Spellbinders Card Creator die.

I chose the triple rose three step stamps from Papertrey Ink's "The Sweet Life" stamp set for my focal point. The roses were stamped first with Memento Angel Pink ink, then Papertrey Sweet Blush ink, with the final layer being Memento Rose Bud ink. I used the matching dies to cut out the blooms, which I adhered to my cards using foam pads. The gold leaves were cut from mirror card using the three smallest dies from the Memory Box Tender Leaves set. The "Happy Birthday" sentiment was cut from the same mirror card using a Simon Says Stamp die and these were adhered with a small amount of Ranger's Studio matte multi-medium, as were the pink and gold sequins. 


The "Thanks" sentiment on the card below is also cut from a Simon Says Stamp die - I love the font used!


I ended up with a batch of two birthday cards and six thank you cards, so I'm very happy with the results!


I am hoping to be back later on today with another card. My blog posts are becoming a little like buses - you wait for ages for one then two come along at once - LOL! Thanks for looking.

Lynn

Monday, 28 July 2014

Papertrey Ink Make It Monday Challenge # 173 : No Outline Watercolour - Friend Card.

Hello again! This is my second post today as I have made another card for the Papertrey Ink Make It Monday challenge - see all the details here http://nicholeheady.typepad.com/capture_the_moment/2014/07/make-it-monday-173-no-outline-watercolor.html.

Please click on the photo above for an enlarged view.
My second card also uses the "Friends 'til the end" stamp set, rustic look card and second generation stamping with Smokey Shadow ink. Again I used a number of masks to give the illusion of depth. This time I used New Leaf ink to watercolour the leaves and Orange Zest, Canyon Clay and Terracotta Tile inks for the flowers. I went around the flower arrangement with a very light wash of Fine Linen ink and stamped the sentiment (also from "Friends 'til the end") with Smokey Shadow ink. The final touch was the addition of some orange and lime green twine (True Hemp crafter's cord) to the spine of my card.
I am really happy with how this turned out! Thanks for looking!

Papertrey Ink Make It Monday Challenge # 173 : No Outline Watercolour - Sympathy Card.

This week's challenge at the Papertrey Ink blog saw Heather Nichols demonstrating how to obtain a beautiful watercoloured card without the stamping showing too much. You can check out Heather's lovely card here http://nicholeheady.typepad.com/capture_the_moment/2014/07/make-it-monday-173-no-outline-watercolor.html .

Please click on the photo above for a clearer view.
 
I used the lovely "Friends 'til the end" stamp set, some rustic looking cardstock and a smokey shadow PTI inkpad. This ink was still a bit too dark for this technique, so I used second generation stamping to achieve a lighter look. I made masks for several of the stamps to gain depth as I was stamping. I dabbed some inkpads onto an acrylic block and spritzed with water before using a waterbrush to watercolour the image. I chose to use Spring Moss and Ripe Avocado for the leaves and Plum Pudding and Royal Velvet for the flowers. I went around the outside of the floral arrangement with a very light wash of the Smokey Shadow ink and stamped the sentiment, from the Meadow Greens stamp set, using the same inkpad. Finally I added some purple twine (True Hemp crafters cord) around the spine of my card to complete it.
 
This was a fun technique to try and I ended up making another similar card in different colours as well - I'll be back later on to show that one.

Sunday, 20 July 2014

Papertrey Ink Make It Monday challenge # 172: Rainbow Medallions.

Hello there! Sorry that I have been missing for a while, but I have been enjoying some quality time with my daughter who is home from University for the summer holidays.

This week on the Papertrey blog Dawn Mcvey has been stamping the same image with many ink colours to create rainbow medallions. You can check out her card and video here http://nicholeheady.typepad.com/capture_the_moment/2014/07/make-it-monday-172-rainbow-medallions.html .

I had a rummage through all of my Papertrey Ink stamps and settled on the pretty frame stamp from the "Boutique Borders: Love" small stamp set to make my card with.

Please click on images for a larger view.
 
I selected the same eight colours of ink that Dawn had used. From top left to bottom right - Pure Poppy, Summer Sunrise, Limeade Ice, Raspberry Fizz, New Leaf, Winter Wisteria, Blueberry Sky and Hawaiian Shores.


Using smooth white card I started to stamp the frame image in various colours, overlapping in the centre as shown.


I continued to stamp in this way, changing inkpads and rotating the card for each stamped image, as shown below.


This is how it looked after stamping six different coloured impressions and you can see how they all overlapped in the centre of the card.


The bottom layer complete. I then trimmed it down to fit onto a five and a half inch square black card blank.


The circular stamps that I have from PTI are all quite small and I decided that I wanted to cover a larger area in the centre of my stamped base layer, so I die cut an octagon shape from white card and repeated the different coloured stamping. This time I only inked up about half of the stamp so that I would get a crisp image all around the edges of the octagon.


Next I cut an even smaller octagon from the same white cardstock and this time just inked one end of the stamp before repeating the rainbow stamping. You can see the completed second and third stamped layers below. I cut slightly larger scalloped octagons from black card and used them to mat the two extra stamped octagons before layering them onto the card.


Finally I cut a tiny octagon from white card and used black dye ink to stamp the circular "just for you" phrase from the "Around and About Sentiments" stamp set. I also stamped the larger flower from the same set - just about managing to ink each of the eight petals with a different ink before I stamped it! This was also matted onto a small black scalloped octagon and added to the card. The final touch was the addition of a tiny black pearl to the centre of the flower and I was done!
 
I am so pleased with how this turned out and I shall certainly be on the look out for other stamps to use with this technique again. 

Thursday, 29 May 2014

Stamped Emboss Resist and Watercolour Wash

I have four cards to show you today, all using the third technique taught in the recent online watercolour for card makers classes. All stamped background images were stamped with Versamark ink and heat embossed using Wow! Opaque Bright White Super Fine embossing powder. I then used my Winsor and Newton Cotman watercolour paint set to add a watercolour wash over each background. The white embossing acted as a resist and gave a lovely result.


For my first  card I stamped the Big Bold Background Belle Flowers by Chocolate Baroque (USQSP0407) onto Bockingford Watercolour paper and heat embossed. I used three colours of paint for the watercolour wash, which I did using a wet on wet technique. I layered the panel onto orange and blue card and a 6" square scalloped card blank. The Birthday die cut and wishes stamp are by Papertrey Ink and I added faux stitching with a Hot Off The Press stamp over the velum and orange card strip. Finally I embellished with a few sequins, which I stuck on with Ranger's Studio matte multi-medium.


My second card was made in much the same way, but this time using the largest stamp from Wendy Vecchi's Art Colors Life set (LCS053). I chose Purple Lake, blue and Viridian green paints for the watercolour wash and used Bockingford watercolour paper again. The "Happy" stamp is from Clearly Besotted's "Happy Everything" stamp set and the Birthday die cut is by Papertrey Ink. I also used sequins to embellish this one.
 
Please click on each photo for a better view.
 
For my third card I used the beautiful background stamp from Joanna Sheen's Tales of the Ocean - Fossil stamp set (JS317). Using Bockingford watercolour paper again I painted with a selection of coral, grey, yellow ochre and beige coloured paints, but this time I tried to keep within the shapes of each fossil, rather than blending the colours too much. The panel was mounted onto coral coloured card and a mottled beige C6 card blank. The sentiment stamp and die are from Clearly Besotted's Mini Basic Banners set and I used Memento London Fog ink. Once again I embellished my card with a few sequins (these came from Abakhan).


My last card is a lager 8" square one. This time I used smooth white card as I wanted to capture the detail from the lovely Big Bold Background Leafy Trails stamp by Chocolate Baroque (USQSP0406). For my wet on wet watercolour wash I chose Lemon Yellow, Sap Green and Viridian Hue paints and blended them together where they met. I used the same stamp and Memento Pear Tart ink to stamp the white card blank, layered the panel onto green card and added a die cut and stamped sentiment (from Papertrey Ink). Finally I embellished with two different sizes of pearls, which I placed where each berry was on the stamped image. I was really pleased with how this turned out - it looks so fresh in real life!