Showing posts with label Core'dinations. Show all posts

Sunday, 30 August 2015

Pandamonium

Today is my husband's birthday and I am sharing the card that I made him here. I used Mama Elephant's cute Pandamonium stamps and co-ordinating dies for the main image and sentiment. The background was done using Core'dinations card in a Cuttlebug bamboo embossing folder and I sanded the bamboo part to reveal a slightly lighter shade of green. This was then layered onto a panel of black card and then onto a white card blank.


Finally I added a length of knotted Japanese Mizuhiki cord and an old Chinese coin. Then I decided to make a second card for my stash, but this time using a portrait layout. This way I had more bamboo showing and I had my little panda sitting high up in it. I chose a different colour of the Mizuhiki cord and a larger Chinese coin for a slightly different look. 


I'm really pleased with how these turned out! The matching dies made it so easy to do and although the design is quite simple, I think it makes an ideal masculine card. I hope that my husband David likes it too! 

Thanks for looking,

Lynn

Thursday, 27 August 2015

You're Sew Special.

Hello again! I'm sorry about the sporadic blogging, but my daughter Jessica is at home for the summer and I have been enjoying some family time before she goes back to University in Kent. 

I have recently made a couple of cards though - this time using the lovely "Sew Special" stamps from Clearly Besotted. 

I started by making a patchwork panel for the background, using several different colours of Core'dinations card stock from the Whitewash collection which I die cut with Papertrey Ink's "Happy Hexagons" coverplate, then embossed with a variety of embossing folders, before sanding. If you're interested you can see how I did this by referring to my earlier post here: http://thehardystamper.blogspot.co.uk/2013/11/coordinations-hard-core-crop-challenges.html 


The sentiment was stamped onto a Stitched Fishtail Flag (cut with a Die-namics die) using Memento Teal Zeal dye ink. I also used the same ink and card to stamp the dress form and tape measure, which I then fussy cut and added with foam pads. The buttons, needle and cotton reel were cut from scraps of Core'dinations card using Spellbinders dies and a little bakers twine and a charm were all I needed to finish off. 

The photo below is a close - up showing the details and texture. I love that cute little Clearly Besotted tape measure stamp!


My second card was made the same way, but in different colours and with a slightly different sentiment.


Again the close - up below shows much more detail. These are really tactile cards in real life - I wish you could all stroke them!


The first card has already made it's way to it's new home with a friend in Surrey and I think that the second one is still en route to another friend in the USA. Thanks for looking.

Lynn

Monday, 25 May 2015

Birthday cards

It was my birthday last month, so I thought I'd show you some of the lovely hand made cards that I was lucky enough to receive from family and friends.


This lovely cat looking out of a window was sent to me by my Auntie Annette, who is on the Design Team for Imagination Crafts.


This beautiful yellow floral card was made by my friend Chris, using Papertrey Ink Stamps.


This lovely oriental card came from my friend Lesley, who knows that I love birds.


This one was from my sister Maria.


I just love this cute chick made for me by my sweet grandsons Max (age 3) and Lucas (age 7 months)!


This gorgeous floral card came from my sweet friend Neet. I love the colour scheme.


Finally, this beautifully coloured shaker card was made by my lovely friend Penny. Isn't that Crazy Bird fun?! I am thrilled with all the lovely cards that I received - thank you all very much! 

Now for another card that I made recently, using Norma J. Burnell's Mid Summer Dragonflies stamp, from Sweet Pea Stamps. I used VersaFine Onyx Black ink and Strathmore Bristol Smooth paper, which I cut with a Lawn Fawn stitched rectangle die. I then watercoloured the image with Distress Markers and added a hint of shimmer to the dragonflies with my Wink of Stella pen. The background is Core'dinations card embossed with the "Rosa" embossing folder by Anna Griffin for Cuttlebug, then sanded back. The birthday diecuts are from Papertrey with the sentiment flags being from a Lil' inker die.


Thanks for looking. I shall try not to leave it so long before posting next time!

Lynn

Sunday, 1 March 2015

Cure For The Monday Blues # 44

I decided to play along with Taheerah's Cure for the Monday Blues again this week as I liked the inspiration photo and had an idea for my own interpretation of it. You can find all the details on Taheerah's blog here.


The inspiration photo is an eclectic pinboard collection, but my eyes were drawn to the "notes" pinned at the top right. So here is my offering for this week. Sorry about all the dots before your eyes, but I decided to photograph my card against my lovely new polka dot tablecloth!


I started with a 6" square white card blank and some Core'dinations Whitewash card that had a black core. I embossed this with a Spellbinders embossing folder and sanded it back to reveal the black core "holes" for my faux pinboard, then I set about making my "notices". The small notepaper stamp is by Mama Elephant from their "Type It" set - thanks to my good friend Penny for the loan of these lovely stamps! I used Memento Dandelion dye ink and a small scalloped border stamp from a set called "Always Time For Tea" by Die-namics to make my yellow patterned paper. All other stamps used are from Waltzingmouse stamps. I found that the small "bars" type stamp from "Free Spirit Boy" was perfect to make the marks on the top note and the middle sized heart from "Sweethearts" was just right for the one in the centre. A couple of colourful brads were ideal for the pins (and I have loads of neglected brads just waiting to be used up)!

The bottom note was a bit more problematical as I couldn't find a tiny horse stamp anywhere - so I adapted the little reindeer from "Nordic Winter" and just didn't ink up his antlers. The lovely scripty hello sentiment from the "Happy Hello Thanks" set was just the job though. I used a resist technique, stamping it in Versamark ink and clear embossing it, then I used a Tuxedo Black Memento marker pen to draw the speech bubble and colour it in, before ironing off the embossing between two sheets of copy paper. A little pink washi tape was used to mimic that in the top photo. The final touch was a bow tied from thick black thread - I liked the effect of the loops as there were also several in the inspiration photo. I'm really pleased with the finished result!

Thanks for looking,

Lynn 

Saturday, 8 November 2014

An Aviation Birthday

Today our eldest grandson Max has his third birthday, so I needed to make him a special card. He is fascinated by all sorts of aircraft and is very knowledgeable for such a tender age. I was admonished by him when I showed him a photo of a helicopter in one of his books - "it's not a helicopter Grandma - it's a Sea King"! Similarly he can tell a Spitfire from a Hurricane etc, whereas I just see a 'plane! We think he might end up being a pilot when he grows up.

So clearly an aircraft card was called for and Clearly Besotted's Take Flight stamps and matching dies were just perfect for the job.


I used a 6" square white card blank and layered some Core'dinations card from the Tim Holtz Kraft Core Nostalgic collection. This was topped with some pretty cloud patterned paper from the "Up, Up & Away" NitWit collection by Lili of the Valley. The letters were cut from the Core'dinations card using the Memory Box Classic Alphabet Upper Case dies and adhered to the card with a dab of Ranger's Studio multi-medium matte.

The aircraft, banners and sentiments were stamped onto smooth white card with Memento dye inks (Love Letter, Tuxedo Black, Tangelo, Dandelion and London Fog). I tried to match the aircraft colours to some of the characters from Disney's Planes (Blade Ranger, Dusty and Leadbottom) as Max is very fond of those too. The coordinating Take Flight dies made it really easy to cut everything out and there is even a little separate stamp for the banner strings, which I stamped directly onto the patterned paper. Everything was stuck onto the card with double sided tape and clear foam pads in selected areas, to add dimension and make it look like the planes were banking round.

I was really pleased with how this turned out and I hope that little Max liked it too.


Here is the birthday boy, modelling the cute aviator hat that his Auntie Jess bought him for his birthday.


We bought Max the matching aviator jacket to match and he looked so cute in his new outfit. Here he is with his Daddy trying to salute. I love the photo below - he looks so pleased with himself!


Thanks for looking.

Lynn

Friday, 31 October 2014

Welcome Baby Lucas

Allow me to introduce our newest grandson, Lucas James. The photo below was taken when he was just one day old and was still in hospital. As you can see I am a very proud Grandma!


I wanted to make a card as a keepsake for his parents, so I started with an 8" square white card blank and added a layer of Core'dinations Tim Holtz Kraft-Core card from the nostalgic collection and some lovely patchwork effect paper (Little One from Kaisercraft's Pitter Patter collection). 

I chose the lovely Starry Bunny stamp from Lili of the Valley (ST 374) for the main focal point and stamped it onto smooth white card using Memento Tuxedo Black dye ink. I cut the panel using a Spellbinders label one die and coloured the image using Copic Ciao markers. The panel was then matted onto another Spellbinders decorative label one diecut and additional layers were coloured, fussy cut and decoupaged with clear foam pads to add lots of dimension. 


The photo below is a close up of the partially concealed tag which I cut from Kaisercraft paper for the front and Core'dinations card for the back, using the largest of the Waltzingmouse stitched tags dies. I left enough space on the tag for details of Lucas' birth to be recorded. 


The Starry Bunny panel was adhered to the card on three sides with foam tape, leaving space for the tag to be inserted. Although the photo below is a little out of focus, you can see the extra decoupaged layers which really make the bunny and teddy stand out.


The Special Day stamp is also by Lili of the Valley. Here it was cut with a Spellbinders circle die and layered onto another Spellbinders scalloped circle diecut. I used a co-ordinating Copic marker to highlight baby's date of birth. The ivy leaf corners were cut with Signature dies and the flowers (all from Wild Orchid) were arranged around the date details.


Finally I added Lucas' name with letters cut with Memory Box classic alphabet dies. Although the card was very time consuming to make, I am very pleased with the finished result and it was well received. 

I am entering this card in the Lili of the Valley October challenge, which you can find here .


The photo below was taken earlier today when Lucas was enjoying his play mat. He is three and a half weeks old now and is as cute as a button! Of course I may just be slightly biased!


Thanks for looking.

Lynn

Wednesday, 15 October 2014

Waltzingmouse October Pajama Party - Challenge 1. Texturise it.

Hello! Today I am joining in with the Waltzingmouse Stamps October Pajama Party - challenge 1 - Texturise it. You can check out the full details here http://waltzingmouse.blogspot.co.uk/2014/10/welcome-to-october-pj-party.html .

This challenge was to use embossed textures but without using an embossing folder. I decided to make my own embossing plate by cutting lots of the Gingerbread Family shapes using my WMS Cutting Edge dies.


I started by cutting lots of the smaller gingerbread boys and girls out of thick greyboard, so that I could use them to make an embossing plate. While I had the dies out I also cut several of each size and shape out of some self adhesive cork sheet, which was ideal as they looked like real gingerbread men!


I took a piece of smooth, thick greyboard and marked out the size of my card blank (5" x 7") in pencil. Inside that I marked out a 6" x 4" panel with a small border to represent the area which I wanted to emboss. The card was also divided vertically, horizontally and diagonally in order to assist with the placement of the tiny gingerbread boys and girls, which I stuck in place with some strong red - lined double sided tape. 


Here is the finished embossing plate complete with eighteen little gingerbread men in neat rows.


I took a piece of 6" x 4" Core'dinations red Kraft-Core card from the Tim Holtz Nostalgic collection and held it in place with some low tack masking tape to prevent it from moving as I passed it through my Grand Calibur machine (using the tan mat and pale pink embossing plate). The photo above shows the embossed piece before I sanded it to reveal the kraft core.


Here is my finished card, matted and layered onto a Kraft card blank with red paper and kraft gingham card. The cork gingerbread men were stamped with Versamark ink, coated with Zing Opaque White embossing powder and heat set to give the effect of icing. They turned out really textured too and I think they look very effective! The sentiment was from the same stamp set - Oven Fresh Gingerbread Joy - and was heat embossed onto a small stitched sentiment flag die cut from a Lil' inker designs die and using kraft card.

I'm very happy with my first Christmas card make of this year and I have enough pairs of Gingerbread men ready to make eight cards in total - so that's a result! Thanks for looking!

Lynn 

Saturday, 12 April 2014

Newton's Nook Inky Paws Challenge #8

Firstly I must say a huge thank you to Jennifer at Newton's Nook, as I was chosen as one of the lucky winners in their March release blog hop and was sent the lovely "Basket of Wishes" stamp set. I discovered that they were running a sketch challenge on their blog here http://www.newtonsnookblog.com/2014/03/inky-paws-challenge-8-sketch-challenge.html  and I decided to enter three cards, all using the new stamps that they kindly sent me.
 
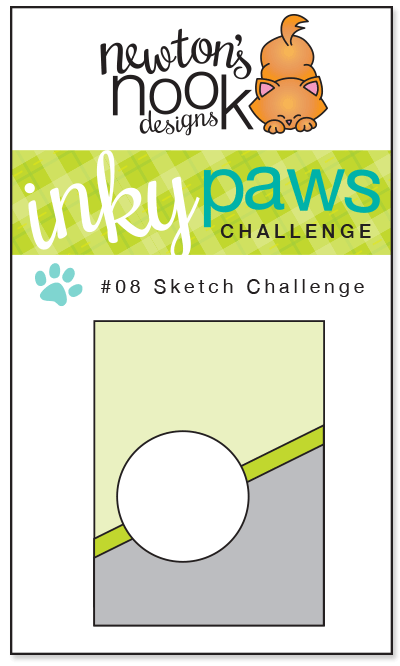
Here is the sketch provided for challenge #8.
 
My first card uses the cute Easter basket, with Newton the cat snuggled up amongst eggs and a little bunny. I stamped the images (the basket bases and tops are all separate stamps, giving dozens of possible variations) and sentiment using Memento Tuxedo Black ink onto a circle die cut with one of the Spellbinders eyelet circle dies. I coloured the image with Copic Ciao markers and layered it onto a pink card circle which I'd cut using a Spellbinders lacey circle die.

 
 I cut some lemon yellow and Aruba blue Core'dinations card into rectangles slightly smaller than my 5" x 7" white card blank, then sliced them diagonally. I took one piece of each colour and embossed them both with a Darice embossing folder, sanded them to reveal the paler core and mounted them to the card with double sided tape. I covered the seam with a length of pretty striped ribbon and added the stamped panel using foam pads.


My second card uses a similar card blank and the remaining two pieces of  Core'dinations card, but this time I embossed the blue portion with musical notes and the yellow portion with pretty flowers. Two narrow strips of the same card were used as the diagonal "ribbon" - all added with double sided tape.
 
The basket of flowers, little bird and musical notes were all stamped using Memento Rich Cocoa dye ink onto a circle of white card which I'd cut using a Spellbinders teardrop die. Again the images were coloured using Copic Ciao markers and then added to the card with foam pads.
 
 
My final card uses a smaller, 4" x 6" cream card blank, a layer of Papertrey ink "Ocean Tides" card and two pretty, muted patterned papers from Docrafts Papermania "Home to Nest" collection. Where the papers joined I covered the seam with a length of Walnut seam binding and added a small bow. The gardening basket and sentiment were stamped onto a circle of cream card using Memento Tuxedo Black dye ink and again I coloured the image with Copic Ciao markers - this time using more subtle colours. I also stamped the top part of the basket onto a scrap of the Ocean Tides card and fussy cut the pair of gardening gloves, sticking them to the card with a dab of glossy accents. 

 
As the Newton's Nook stamps are made from clear photopolymer I was able to slightly bend the sentiment so that it curved around the top of the cream circle. I added a scalloped layer of the Ocean Tides card, cut with another Spellbinders die and used foam pads to mount the panel onto my card. I think that this one would be suitable to give to a man as the colour scheme is quite muted.
 
I really enjoyed playing with my new stamps! There are two more basket filler images and several sentiments that I haven't used here, so I shall be making some more of these cute cards in the near future. Thanks again to Newton's Nook and thanks for looking!

Saturday, 5 April 2014

Cupcake Inspirations Challenge 254

 
Earlier this week I discovered the delicious looking Cupcake Inspirations challenge blog here http://cupcakeinspirations.blogspot.co.uk/2014/03/challenge-254.html . Their sponsors this week are Core'dinations and I am a great fan of their colourful card so I decided to join in with this week's colour themed challenge. I have made two cards, both using 5" x 7" white card blanks and Core'dinations card.


For my first card I cut a panel of "Aruba" Core Color card and embossed it using a Darice Circle Background embossing folder and my cuttlebug machine. I used some lemon yellow card to die cut a panel for the sentiment using one of the Spellbinders Card Creator A2 Polka Dots dies (S5 - 133). The sentiment is from the JustRite "Seeds of Summer" clear stamp set (CR - 03755) and was stamped using one of Wendy Vecchi's new Archival ink colours, Forget-Me-Not, which is a lovely shade of turquoise blue. I then cut a white card panel with a Spellbinders Labels One die (S4 - 161)  and used Memento Tuxedo Black ink to stamp the pretty petunias image from the same "Seeds of Summer" JustRite stamp set. I coloured the petunias with Copic Ciao markers - Aqua Blue (BG01), Yellow (Y06) and Yellow Green (YG03). I used double sided tape to add the yellow panel to the card and foam pads to adhere the white flowery panel over the top. A row of three yellow pearls was the finishing touch.


For my second card I took two strips of Core'dinations in Aruba blue and a lemon yellow colour (which was from the Tim Holtz and Ranger Adirondack collection), and embossed them both with a Darice "Scroll with bird" long embossing folder in my Cuttlebug machine. These were adhered to the white card base with double sided tape, so that they joined in the centre to form one background panel. I cut two white card panels from the Spellbinders Deckled Rectangles large dies (S4 - 202) and used Memento Rich Cocoa ink to stamp "A Little Hug" by Leanne Ellis for Sugar Nellie and the "Thanks for being there"sentiment from the "Rescue Remedies Additions" stamp set by Waltzingmouse stamps. I coloured the image with Copic Ciao markers - Aqua Blue (BG01), Yellow (Y06), Chamois (E35), Skin White (E00) and Burnt Umber (E29). The two white panels were mounted onto the card using foam pads and the smaller one was embellished with a row of three tiny aqua coloured pearls.


I'd like to say a big Thank You to my good friend Lana, who gave me the Sugar Nellie stamp as part of my Christmas present last year!

Saturday, 8 March 2014

Moxie Fab World - Happy for Hexagons challenge

The current challenge over at the Moxie Fab World is to create something with hexagons http://www.moxiefabworld.com/2014/02/hexagons-happy-for-hexagons-challenge.html . I decided to get out my Papertrey Ink Happy Hexagons cover plate and Core'dinations whitewash card stock again, to make a patchwork background for a pink sewing themed card. Please click on the photo below for a larger view. I apologise for the quality of the photo, but I had to use flash as it was dark when I took it.


I started with a white landscape card blank and added a layer of marbled pink paper and a pink polka dot ribbon and bow. I diecut the happy hexagons coverplate five times in total - in pale pink for the hexagon frame and in a darker pink, blue, purple and jade green for the tiny hexagonal pieces. I selected some of each colour of the hexagons and ran them through my Cuttlebug with various tiny patterned embossing folders (all by Cuttlebug). Then I sanded each piece until the core was visible, giving them a lot of texture. I mounted the frame to the pink card layer using plenty of double sided tape so that I could then add the individual hexagons and they would stick to the tape. I had lots of pieces left over and another four frames, so I have kept them all for later projects.

The patchwork effect reminded me very much of quilting, so I decided to add a sentiment from Waltzingmouse Stamps "Sewing Box Hugs" stamp set and a stamped pincushion (by Our Daily Bread Designs), which I coloured with Distress markers. The cotton reel and needle dies are from Memory Box and the dressmakers dummy and buttons were cut from Spellbinders dies. I used pink and white bakers twine for the thread and to "sew" the buttons. All diecuts and stamped images were adhered to the card using foam pads to add more dimension.

I'm really pleased with the finished result and I'll be sending this card to one of my friends, who has a birthday later this month.

Thursday, 28 November 2013

Happy Thanksgiving!

Today is Thanksgiving in the USA, so I'd like to wish all my American friends a very happy Thanksgiving - I am truly thankful for you all!

Earlier this week I made this autumnal themed thank you card for a friend in America who had kindly sent me some lovely crafting goodies.


I started with a square black card blank and added a layer of black and cream paper from Graphic 45's Steampunk Spells Patterns & Solids pad. Another layer of cream card was added with a stamped sentiment from the Waltzingmouse "Blessed By You" stamp set (I actually used parts of two different sentiments to get this particular combination). I embossed a small square of Core'dinations Chocolate Box collection card using a Tim Holtz Alterations Texture Fades embossing folder by Sizzix and sanded the card to reveal the coloured core inside. The oak and acorn wreath and sprigs from "Peace and plenty" by Waltzingmouse stamps were stamped onto cream card using black Memento ink. I coloured all the images with Copic Ciao markers and cut them out by hand before mounting them onto the card front using foam pads. Finally I highlighted all the acorns by giving them a coat of Ranger's Glossy Accents.

The photo above doesn't really do justice to the card as the colours were much brighter in real life. Poor daylight in the winter in England isn't really conducive to photography! I hope my friend liked it though.

Wednesday, 20 November 2013

Indigo Blu Challenge no 9 - Chocolate Orange.

This is my entry for the ninth challenge over at the Indigo Blu Challenge Blog  http://indigoblublogchallenge.blogspot.co.uk/2013/10/challenge-9-chocolate-orange.html .
This month's challenge was "Chocolate Orange" and I used the "Bare Forest 1" stamp (Code:BF 1) and the "Little Voice" stamp set (Code: LV) to stamp the Get Well Soon sentiment. I had to use separate words and letters from two of the sentiment stamps as I didn't have an Indigo Blu stamp with the message that I wanted!


The embossed panel on the right was a piece of Core'dinations Chocolate Box card stock which I embossed with one of the Tim Holtz Textured Leaves embossing folders from the Alterations Texture Fades collection by Sizzix, before sanding to reveal the orange core beneath.
 
The panel on the left was a piece of Indigo Blue perfect pastel smooth card stock which I coloured using Yellow Ochre Tint, Orange Tint and Orange Pan Pastels. I then stamped the lovely Bare Forest trees over the top with Memento Rich Cocoa ink. Both panels were layered onto Orange Zest and Chocolate Brown card stock, and an orange grosgrain ribbon was added before mounting onto a white card blank.
 
The collection of autumn leaves were die cut from the leftover card scraps using Impression Obsession leaf dies. The tiny leaves were cut using a Memory Box die. The leaves were all stuck on with foam pads of varying thickness to give a more dimensional look.
 
Not content with making just one card, I came up with a similar version for our nephew's birthday next week. The sentiment was stamped using Waltzingmouse "Compact Sentiments" and "Compact Family" stamps as I didn't have the appropriate Indigo Blu sentiment stamps.


I really enjoyed using my Pan Pastels and the Bare Forest stamp is gorgeous, so I shall definitely be trying this again (maybe wintery colours would look nice - possibly with a touch of snow).
 
 
EDITED to add that I had problems linking up my blog to the Indigo Blu Challenge blog (my stupid laptop decided to install some updates and then freeze just as I was using the inklinkz widget) - so I'm not sure if  I've actually managed to enter the challenge or not! Never mind - at least I have made two cards that I needed!
 

Friday, 15 November 2013

Thanks Sew Much ...

This afternoon I had an appointment with my Careers adviser Jane. She is a lovely lady who was ever so helpful and, as this was my final appointment with her, I wanted to give her a thank you card.


This is another variation of the patchwork card from my post here http://thehardystamper.blogspot.co.uk/2013/11/coordinations-hard-core-crop-challenges.html , this time with a green frame and a combination of four different embossed and sanded hexagons. I used Core'dinations card stock again and I love all the different textures resulting from the embossing. The cotton reels, needle and thread dies are all from Memory Box and the dressmakers dummy and buttons were cut from Spellbinders dies. The cute sentiment is from a small stamp set by Waltzingmouse Stamps - I can see me using this a lot as it fits in so well with anything sewing related and I like the modern font. I'm pleased to say that this card was well received, so I expect I shall be making some more similar ones as the Papertrey Ink hexagonal cover plate die is really lovely to use, producing something that is just that little bit different.

Monday, 11 November 2013

Core'dinations Hard Core Crop Challenges.

Core'dinations are holding a series of challenges this week and as usual I am at the last minute to get my entries in. I was late finding out about these challenges, but as I love using Core'dinations card I just had to join in.

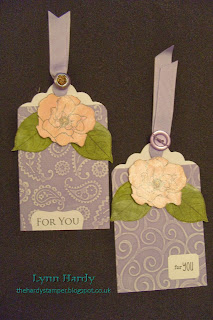
The first is for Kate Nolan's challenge - two stamped tags. I used two different Cuttlebug embossing folders to emboss patterns into two pieces of lavender coloured Core'dinations card then sanded the raised areas to reveal the lighter coloured core. These were then added to two tags along with some lavender coloured grossgrain ribbon, which I attached by tying buttons on with twine. The "For You" sentiments are both by Waltzingmouse stamps and were stamped onto white card which I cut to shape using Spellbinders dies.  The roses and leaves are from the "Roses in Bloom" stamp set by Waltzingmouse stamps.They were stamped onto white card, painted using watercolour paints which contain mica, fussy cut out then adhered to the tags using double sided tape for the leaves and foam pads for the roses to give them some dimension. Finally, you can't see on the photo, but I stamped "To" and "From" on the back of the tags, so that they are all ready to be used.


The second entry is for Tami Mayberry's CAS card challenge. I don't usually do "Clean and Simple" cards - mine are usually more elaborate creations and often take me many hours to make! CAS is a great idea for Christmas cards though, as it's much easier to make them in batches if the design is quick to produce. Here I used a piece of Kraft card to make the base of the card and then added a single layer of red Core'dinations card which I had embossed with a Cuttlebug embossing folder and sanded to reveal the paler core as before. I chose Memento Ladybug red ink to stamp the sentiment and ornament onto kraft card, which I then cut out using Spellbinders dies. Both stamps are from the "Vintage Ornaments" stamp set by Waltzingmouse Stamps - I love these as they all have corresponding Spellbinders dies and it makes it so easy to get great results! I used foam pads to raise up the ornament on the card, then embellished it with a row of sparkly red diamantes. It's at this point that I wanted to start adding ribbon etc, but we were only allowed to use no more than two embellishments, so that's it - my first ever CAS card!


My third entry is for Gail Linder's Patchwork inspired background challenge. This one is totally not clean and simple! In fact it took me well over eight hours to make but I am very pleased with the result. I selected seven different colours of Core'dinations card stock from the Whitewash collection and die cut them all with my Papertrey Ink "Happy Hexagons" coverplate. I decided to use the cream coloured one for the background grid, which I stuck to another layer of similar coloured card using double sided tape. Next I pushed out all of the little hexagons, half hexagons and triangles from the other six die cuts and embossed them all with a variety of embossing folders which had small designs. Each individual piece was then sanded to reveal the darker coloured core, which took ages, and as you can imagine I had sore fingers for a while too! The next step was to insert the hexagon shapes back into the grid, forming the lovely patchwork design for the background. This was then layered onto a piece of pale blue Core'dinations card, which I had sanded around the edge. The panel was then added to a white card blank and embellished with a narrow stitched ribbon and a sewing machine charm. I used the leftover bits of Core'dinations card to die cut the dress form with Spellbinders "S5 - 145 French Frills" dies. It's hard to tell in the photo, but the dress was then stamped using one of the co-ordinating stamps by Samantha Walker for JustRite Stampers (SW - 04105 Ooh La La French Frills) and Papertrey Ink's Fresh Snow ink. The buttons and scissors were also cut from scraps of Core'dinations card with Spellbinders dies and the needle and spool were made with Memory Box dies. I threaded the needle with baker's twine (which was then adhered to the card with double sided tape), used the same twine to "sew" the buttons and also wrapped some of it around the spool, before sticking everything onto the card using foam pads to add dimension. Finally I diecut another small hexagon, this time using the smallest Spellbinders hexagon die, stamped the sentiment (from JustRite Stampers) on it and stuck it in the top left of the card (again using a foam pad).  I really enjoyed making this card and have enough "bits" left over to make a few more with different coloured hexagonal grids. I am planning to send this one to a friend who loves sewing and who has a birthday next week - I hope she likes it!


The final card is for Clare Buswell's Quick and easy Christmas cards challenge.  Clare has just secured a place on the 2014 Design Team for Craft Stamper magazine - which was how I came to check out her blog and discover these challenges. I have much admired Clare's work previously - she used to be on the Waltzingmouse Stamps Design Team until recently and has some beautiful cards on her blog http://clare-buswell.blogspot.co.uk/ . I am really looking forward to seeing more of her wonderful creations in Craft Stamper next year.

I started off with a square kraft card blank and added a square layer of gold textured card. Then I selected a dark green sheet of Tim Holtz Kraft-Core from the Shattered collection and embossed it with the December Calendar folder from the Tim Holtz Alterations Texture Fades (by Sizzix). I also embossed a strip of "Old Paper" coloured Core'dinations card from the Tim Holtz and Ranger Distress collection, using the music border folder from Tim's smaller Texture Trades set. Both pieces were then sanded to reveal the core and layered onto the card base (on top of the gold layer). My chosen stamps were all from the "Santa's Coming to Town" set by Waltzingmouse Stamps. I filled the gap at the bottom left with the sillouette of Santa and the snippet of lyrics from the Christmas song (I used Memento Northern Pine ink). I chose a vivid red from the Core'dinations Brights collection to diecut my ornament shape with a Spellbinders die, then I stamped it with the co-ordinating image and sentiment using Memento Tuxedo Black ink. A thin strip of the gold card was attached to "hang" the bauble from (again using foam pads for dimension). I think the calendar looks really effective and I might make some more cards similar to this for Christmas.


EDITED: To add that the above Christmas card was chosen as the winning entry on Clare's blog. I am thrilled and have won a 12" x 12" Tim Holtz Seasonal Impressions Core'dinations card pack!
 
I really enjoyed taking part in these challenges and would have liked to have done more of them, but there were sixteen in total and I just didn't have the time. I hope that you like the four that I managed to finish!